About 10 years ago, (maybe more, time flies so quickly) I bought around 30 assorted carving gouges from a blacksmith in the Philippines. His facilities were quite rudimentary, but the products which he produces are not bad. He uses old leaf springs for the steel and real charcoal to fire his forge. He has an electric grinder with dozens of different wheels to grind the inside profile of the gouges. Some of these are in better shape than others.. Over the past however-many years, I have taken the time to sharpen and handle around 8 of these. I use them right alongside all of my
Pfeil tools, and though they need a bit more frequent honing, honestly, they work just as well, so long as they are kept sharp. This morning, I got busy and did two more because I really need a finer V gouge and a small fluting one. All of the gouges I have sharpened so far were done because I needed that particular profile.
 |
Bent V gouge and straight fluting gouge blanks,
both are 4,5mm |
 |
The grinding stones pose the biggest challenge; their profiles leave a lot to
be desired because they do not follow the outside edges very well, |
 |
| An assortment of oil stones and slip stones used to sharpen and shape the gouges |
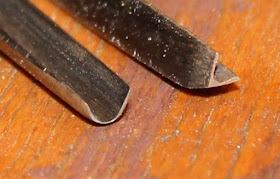
I learned a very useful sharpening technique from Chis Storb, who works as the furniture conservator for the Philadelphia Museum of Art. He grinds the heel of the V gouge back quite a bit so that there is not so much metal trying to jam itself into the cut which the tool is making. It makes a huge difference. Below is one that I have not gotten around to re-sharpening that way, and the new gouge which I just did, using this method.
 |
"Out of the box" bevel, and a re-ground bevel which lessens the drag caused
by too much metal on the heel of the gouge. |
It always amazes me the difference a few extra passes on the strop will make. The gouge marks on the right of the photo below, were done when I thought they were sharp. It did not take long to see that they were not. A few more passes on the inside with a shaped piece of wood charged with oil and rotten stone made all the difference, as can be seen by the gouge marks to the left.
 |
Testing the gouges on some old white pine. I purposefully used this wood
because when it is old and brittle it will tear even if fresh wood would not.
My strop is to the left. |
 |
| A chunk of mulberry from the firewood pile will give a nice pair of handles |
 |
| Bringing the handle to shape |
 |
| 2 Sharpened and handled gouges, ready for service. |
 |
Another handle from years ago; the mulberry will take on a nice colour
which is why I like to use it. |


No comments:
Post a Comment