Showing posts with label elm furniture. Show all posts

Sunday, October 2, 2016

Johann International goes to the Fair

Next weekend I will again be exhibiting at the Waterford Craft Fair, in Waterford Virginia. This is a quaint little town tucked in a valley near the Potomac River which time has mostly forgotten and, by American standards, is rather "old". I like doing this show because the exhibitors all dress in period, (or period inspired) clothing and demonstrate their crafts to the visitors. This gives me the excuse to dress up without people thinking I am a 'freak' (actually I am, but no one needs to know) and provides an opportunity for me to give others a glimpse of what goes into actually making something by hand, instead of with machinery.


Carved from antique, re-claimed timber, this is my interpretation of a
16th century "strap-work" box. Inspiration for the front dovetail and rebated
back joinery comes from a mid 16th century box in the V&A


Last year, a storm washed out the event, so I was not able to participate, thus this will be my third year of attendance. (the show has been running for 74 years) Because of the work I have been doing on my moulding project, I have had no time to make anything new for the show this year, but since I had no show last year, and was 'ready' then, I will just consider time to have stood still for a year, (it feels like it has anyway) and whatever was ready last year should still be ready this year.

Many pieces which I will be exhibiting have been seen on this blog before; here is a collection of things that have not been featured yet. Most of them were made just before the blog got started and a couple of them were made quite some time ago.I thought this might be a good excuse to showcase all of them, since I probably never would otherwise. All of these pieces have been made entirely by hand without the aide of machinery, (except the sawmill that cut it, the lorry that carried it, and... OK, all the work I did was by hand)


A close up showing the strap-work detail and the hand forged iron nails which
I embellished with a file.
Yours truly, in my shop, getting ready for a show

This is a delightful little form, or boarded stool, in the late medieval style

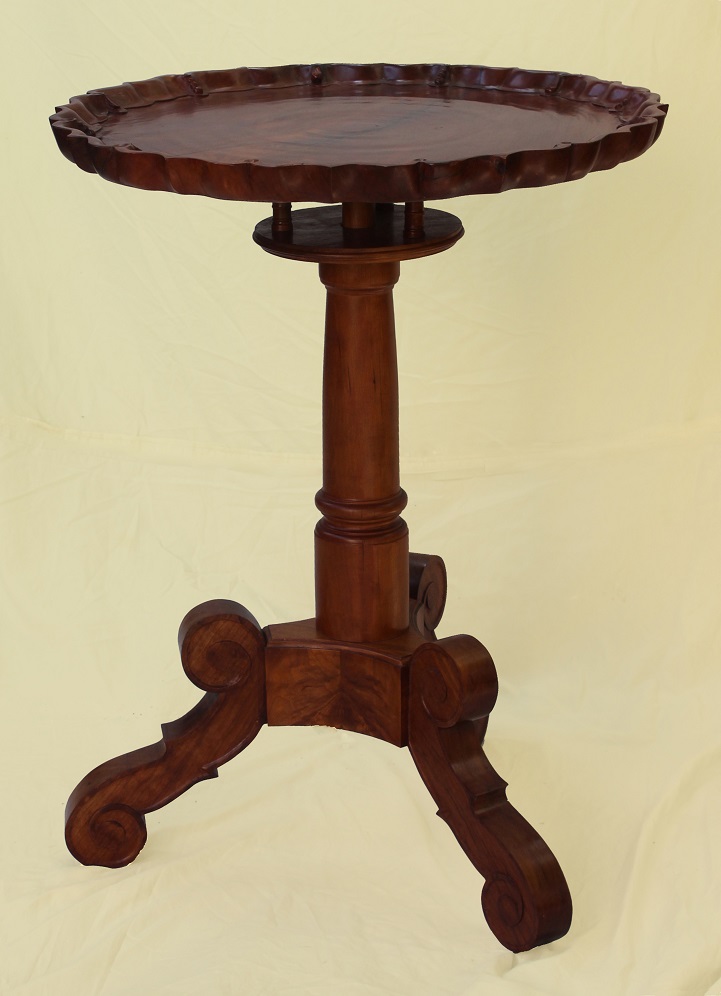
A baroque inspired revolving top table, in cherry

An 18th century "barrel back" corner
cabinet. I formed the hinges with a file

This and the following table were commissions, but the client is kind enough
to loan them to me for the show.


Inspired by 18th century style; made of American walnut
A hanging plate rack in the 18th century French
Provincial style, made of cherry
I love boxes, and love making them. In fact, if I could get enough clients to support me in such an endeavor, I could be perfectly happy to spend the rest of my life making boxes and chests. Below are a few that I have to offer.


Oak with cherry edge-banding and an inlay of
holly and walnut. This is a traditional English
style "candle box" of 18th century form

I used a "rat-tailed" saw to cut out the core from a solid block for this box

One of my best boxes, this was cut and carved from a block of extremely
dense and hard American walnut. This wood took on a lovely chocolate
colour and a fine polish; it is not stained.  I also made the escutcheon, the
hinges are traditional 'snipe' hinges.

No; the large worm hole did not "bother" me in the least

Most people think that black locust is a nasty wood; it is a bit of a challenge
to work by hand, but I find the colour it takes on to be worth the trouble; it
quickly mellows to a rich amber.

This was another fun project that I spent way too much time on, but
enjoyed every minute of.
As I said, I spent way too much time on it!


Most of what I have to exhibit has been made in the past couple of years, but there are a couple exception, including this box. It used to be for sale; in fact I made it with the hopes of selling it at a show I did... in 1998! For some reason, no one ever seemed to be interested in buying it, now I have had it so long, that I do not wish to sell it any longer, but do still like to exhibit it.


The design for this echoes a much larger early 16th century chest in the V&A


The above picture was taken in 1998, not long after I had exhibited it in my first show. This was the third carving project I had ever attempted, and by far, the most ambitious at the time.  Not long before making it, I made an accidental discovery of a cleaning chemical which nicely darkened mahogany to a rich deep red-ish colour. I treated this box with that chemical...


The box as it looks now
The deep red colour did not last, however, and now it has mellowed out and turned much lighter. It actually has a colour which looks much older than its 19 years of age, so I am not actually disappointed with the experiment. 


Yours truly again, at a show last year, demonstrating my work


Wish me a good show for this year...


Sunday, November 22, 2015

Table, Part X; Finished (Mostly)

It has quite some time since I posted anything about this table, and people have been asking me when it would be finished. It was actually done in August, but the clients were out of the country at the time. Basically, their schedule and mine did not agree for an earlier delivery time. I did deliver it a few weeks ago, but forgot to take my camera with me. These pictures were kindly taken and sent to me by the client. I just wanted to share them for anyone hoping to see the end of this project.


In this picture it is plain to see the reason for the table's unusual shape


A view of one of the feet


Another view


In the title of this blog I said that the table was "mostly" finished;
That is because the chairs for this table are not of a conventional
height and the table must be raised 50mm. I will make some additional
feet to attach to the underside of these bases. 


This weekend I am exhibiting at a trade show in York Pennsylvania, and will be posting about that next week.

Sunday, August 9, 2015

Eventually, most projects get completed

People often ask me what I do with my "free time". Their question assumes that I have times in which I am not in my workshop working. In truth, there are such times; for example, right now when composing this (very short) blog. I also have to go to the store to buy things once in a while, as well as seeing to other matters not related to my job, but are necessary in order to live...but these are few in number, and I spend most of my time working. I actually happen to like it this way.


My "baker's cabinet" made of elm


The question is usually intended as an inquiry into what I do for self entertainment; the answer. More work. The only real distinction about my "pleasure time" and "work time" is that what I do for "work" I  (usually) get paid for. What I create for pleasure, I almost never wind up selling, and so in essence, am making something for myself. One good thing about this sort of work, is that I get to make what I want, without worrying about someone liking it or not; because I was not making it for anyone in the first place. (This is not to say, however, that I do not like making the things my clients order, because I do. I am one of the few lucky ones who actually happens to like doing what he does for a living.)


Crest carving and marquetry detail

The downside to making things for myself is that since I am almost always busy trying to make a living, I have very little time to make anything else, so when I begin a project, it might be months or even years later before it gets completed. I am happy this week, because I managed to get one such project ticked off of the "to be completed list" (it is a rather long list, actually) Sometimes I get a boost, because I need to show someone the project, so must set myself to finishing it up. 


Lid and box-front detail


Such was the case of this hanging shelf/cabinet/whatever-you-want-to-call-it, thing which I began almost one year ago. (11 months to be exact) I am calling it a baker's cabinet, because as I see it, the box compartment is for flour and sugar, and the shelves are for oil, spice, and other things useful for baking. I hope to find someone to make some ceramic jars to use with it. I will offer it for sale at the Waterford Craft Festival in October, but I do not really anticipate anyone wanting to buy it. It is a whimsical piece which I conceived after seeing this photograph on the internet.


Original Inspiration


Comparing this original piece to what I created also speaks a bit about my sense of taste and design; namely that for me, the original was a bit too primitive and rustic looking. I decided to dress it up a bit with some veneer and edge banding. I like the hand made look, to show in the work, but at the same time, like it to be obviously well made. I also really have a hard time with simple, plain, and ordinary. Of course, the more ornamentation, and care one puts into a piece, the longer it takes to get it finished, and thus this one took nearly a year.


Several weeks ago I mentioned a 9th century box I Intend to make, that one should get its debut on this blog next week, In fact I mention it here to give myself a bit of motivation to make some more progress on it, No matter how busy one is, we always seem to make time for what we want to do, I want to make time to get this box going, and so far all I have done has been to turn the four legs and carve three of them. Posting this here will make me make the time to do what I want to do anyway. This week, anyone who wants to know what I will be doing in my "spare time" can know that I will be working some more; making something that is even more of my own soul, because I have to answer to no one for it.


This picture not available until next week

Sunday, July 26, 2015

Table Progress - Part IX

The table is finally nearing completion. On the third of August the clients will be coming by to make a final approval of everything before I do the finishing. There are still a few loose ends, such as the iron bits that are not all finished, but here is the next to last post on the topic. The next time this table is featured will be when it is ready for delivery. This week we will go into detail about the table leaves and the slide mechanism, as well as a bit of discussion on draw-top tables in general.


One of these days it will actually be finished


I had some pictures of how I made the structural members for the apron, but they were lost when my memory card gave out. Once the supporting sections were completed I began working out the slide mechanism. On a draw top table, the principle is that the slides run under the top and are connected to the leaves. These guide rails are generally long enough that the weight of the top is able to support the the leaf. One drawback to that method is that if someone presses to hard on the extended leaf it will lift up the main section of the top.

When I was a kid we had a huge draw-top dining table and I remember a couple of unpleasant accidents caused by someone attempting to push themselves up from their chair by pressing down on the extended leaf. Not a pretty picture. To prevent this from happening, and because my guide rails are not long enough anyway, I will be using an iron cross-tie  which will prevent the leaves from being pressed down. In this series of photographs that has not been installed yet, however.


Setting out the slot for the guide rails


Cutting said slots


One down...the other three are already gone


The slots in which the guide rails will run also serve as a track for the rails to run in, therefore they had to be cut precisely.


Of course the ends of the guide rails cannot just be square


Cutting out a decorative end


In a situation like this, it is much faster to make a couple of straight down cuts and then use a chisel to finish up the shaping.


And of course they cannot be without a little extra ornament made
with a carving gouge as well


Trimming the ends of the leaves


I opted to use straight timber which had some curve to the grain and cut the curve in the stock, as opposed to bending these short segments. As it turned out, I should have used one piece, steam bent it, and then cut it into segments as needed. It was a bit of a challenge to get the inside curves to meet up without a gap. I did manage, but I think it would have been much faster with bent timber. I deliberately left the end wide so that I could place the finished leaves under the top and trace the outline. Once it had been traced, I cut the waste material off and planed the edge smooth. (I used a spokeshave for the inside curves.)


When you cut from one direction and then turn around and come back to
the place where you stopped you will be able to see if your cut is
running square 

Using a cabinet scraper to do the final smoothing


I love cabinet scrapers, and have no idea why anyone would want to sand instead. In addition to getting a nicer surface, the scraper is one hand tool that actually takes less time than the a machine. It took me less than a minute to get this little pile of fluffy shavings, but to remove the same material with a sander would take at least 20 minutes; not to mention that one would have to change grit 3 or 4 times.


Guide rails in guide ways

The table; ready to receive the main section of the top
The contraption on the end is to prevent the leaf from falling. 

It looks good; it feels good to be at this point as well


Top with leaves extended


One of the things I like to do with draw top tables is to put a little bead moulding between the two sections of the top. This helps to disguise the line between the lower and upper parts. The way I do it is to make the top thicker than the leaves, and then use a scratch stock to add the bead to the bottom edge. The lower leaf is the thickness of the top, less the bead. In order for the table to have a uniform surface when the leaves are extended, however, spacers must be added between the leaves and the guide rails. In this picture, I have not yet put the spacers, thus the leaves are currently lower than the top.

I had hoped to install this iron brace today, but spent the whole day getting the leaves and guides set up. I lost count of how many times I took the top off and then put it back on, but it was many.


One of the two braces which a blacksmith and I made this past week at his
little forge. That was a lot of fun, so much so that I did not get any pictures.
I got to play at being a blacksmith myself.


Sunday, July 5, 2015

Table Progress - Part VIII


Our last episode of the table saw the legs completed and the outside frame added to the table top. At that time, there was still a lot left to do, to reach the point of having something that looked like a table. There still is, but as Aerosmith sang, I have been chipping away, at the wood though, not the stone; oh well, it kind of worked.


It begins to look like a table
The block is a counter-balance because the apron section is not yet
attached to the legs.


The first big thing for the continuation of progress was to get the apron built, in order to do that, I  had to make the four blocks that would join the corners together. Actually, at the time of the last post, they were already made, but I saved that bit for this post, because what I intended to do with them might not make sense until one could see the end results.


Layout of the corner blocks


Because the table top is a section of a circle, the corner blocks needed to be slightly wedge shaped to fit their respective segment of that radius. I decided the best way to make them would be to draw a template on my pattern, and use it as a guide to check the blocks, and to set each angle with the bevel gauge.


There is no right angle to any two sides of the block


I began with a square block, and then, using one face, set the angle for the next face, working off the template; I then marked the block to that angle and planed to the line.


Checking the set angle to the block after planing


Working one side at a time, I went right the way 'round each block, planing or sawing and then planing, to get each piece to match the template.


To remove a lot of stock, sawing is faster than planing


Meanwhile, I still had to finish building the top, and that meant adding the inside frame and the two end cleats. Getting the inside piece on was a bit of a challenge, because the tenons would not let the edge slide on. The solution was to bevel the inside edges of the tenons; the farther they were from the centre, the more angle they needed. In this way, I was able to get the part on. I got too busy doing this and did not take any more pictures of the process, or of the end cleats of the frame which are joined to the sides and serve as a means of locking them together.


In order to get the inside frame on, the corners of
the tenons had to be eased


End cleat, connecting side frame rails


Back to the apron project; I decided a long time ago, that the best way to build this table would be to make a box out of the apron section. Since the top and leaves will be movable, they cannot be attached to the apron or the legs, yet somehow the legs and apron must be firmly connected to each other. By making this section as a box, I will be able to accomplish those two goals.

Planing by hand is much more quiet than with a
machine, but it sure makes a mess


To make the box, I began with the timbers which served as the steam-bending form for the frame. I cut the parts to the correct radius, glued them together, and then planed them flat. Since this is the underside, it does not need to be smooth, and I actually like the rough planed look on undersides of things, If you look at any pre-industrial revolution piece of furniture, this is what all the backs, bottoms, and insides of things look like. (Unless something needed to be glued to it, then it had to be planed smoother.)


Now we are beginning to make some progress...


Another advantage of this 'box' method, is that I now have a way of keeping the apron in the right shape. Over time, it could attempt to distort, were it simply an open frame.


...One of these days it might actually look like a table


I left the ends of the 'floor' of the box a bit long so that they could be trimmed once the sides and corner blocks were attached. That took the guess work out of getting the measurements correct. Most people now-days use patterns and plans to make everything. They wonder what historical plans looked like; they did not look like anything, because no one made them. Cabinetmakers just made the parts fit to each other as they went along, their knowledge of how things should be made and joined, and the power of their mind to imagine the entire project in it completion, was their only guide. (They did use templates for unconventional angles and shapes, though.)


With a bit this large, one gets a work out with this
tool (32 holes)


Once the sides were set, I made the mortises in the end blocks. I also made slots to allow for the bottom of the box as you can see here.


Test fitting - Hey, it fits!


Putting together, and then taking back apart, is a big part of this sort of work. I had not even carved the end piece at this point, but since it had to go together and come apart several more times before final assembly, it did not matter. Even if everything fit perfectly on the first go, one still must disassemble it to drill the holes for the pins, assemble it again to mark the holes for the tenons, then take it apart one more time to drill them.


Scrub planes make great panel planes too


With the test fit of the end, I was able to mark the correct line to cut the end of the floor to. It then had to be re-beveled to go into the rebate in the inside of the apron end.


Mechanical method of attaching two pieces together


I do not like relying solely on glue for joinery. No matter how good the glue is, it will fail at some point in future. If glue was all that was holding the parts together, that means to say that at some time in future, the piece will collapse, I do not want that to happen to anything I build, and therefore, I use mechanical means of fastening things. In this case, were the join between the apron front and the bottom to fail, the apron would have a tendency to spread; to prevent this, and keep it connected to the floor, but not have anything showing from the front, I used double dovetail keys, or "butterflies". This is actually a very old joinery technique; in the book, English Historic Carpentry, by Cecil A. Hewett, there is a large "Saxon" door of pre-conquest (1066) manufacture, which used large double dovetail joinery on its face.


One end down...one to go
The gap in the carved channeling is where the slides for the leaves will go.


Once the first end was joined and pegged, I had a sense that finally I was actually making some progress on the table...


Still a long way to go, but it finally begins to look like a table


...until I made a list of all the things which still need to be done. The list is too long, but the major things are spending a few hours doing the final smoothing with a cabinet scraper, finishing the leaves, attaching the legs to the body, and doing the finishing. By the end of the month it should be completed though.