Sunday, February 21, 2016

To Ornament Or Not; Part IV - Availability of Patterns

In my ongoing series about the ornamentation of medieval furniture, I feel it useful to discuss a concept which might not have occurred to most modern readers. This is the fact that, unlike in our era of an abundance of photographs, the medieval artist had far fewer resources from which to draw inspiration. Lets all agree from the start that no artist creates anything from a vacuum, and every artist draws inspiration from other art which he sees around him. He then takes that inspiration and, filtering it through his own soul, creates a new work which is his own. This is one of the reasons that the study of history is so important, that we may realise that we owe everything we are, to those who came before.
Temptation and Fall, from the Solerno Ivories. 11th century
(photo taken from the book in my collection)

If I want to carve an acanthus leaf on the apron of a table, I first try to create it directly from my imagination, if I am not satisfied with those results, or if I feel I am not able to visualise it well enough without help, I will go to the books in my personal library and search for something that looks similar to what I have in mind. If I do not find anything that speaks to the vision that I have, I may try to go to an antique shop or museum to see if there are any pieces with something similar to what I want to carve. Failing that, I may try an 'on-line search' in hopes of finding a suitable model. From reading this, you get the idea that there are a lot of sources 'out there' from which I may draw inspiration.


Temptation and Fall, from the San Marco mosaics, Venice
(photo taken from The Solerno ivories)
It seems quite likely that both of these artists were working from the same
model, though each artist added his own touches to the composition.


What about in the Middle Ages? Obviously one could draw from nature, and every artist had objects around him, but there were also pattern books which where available to every type of craftsmen. How many of these were available, and the percentage of artists who actually owned one or more of these books or pamphlets would be impossible to tell. The earliest surviving example that I am aware of, comes from the beginning of the 13th century, known as the Reiner Musterbuch, it is a collection of drawings and alphabets, used by artists for inspiration in their own creations. Though there may be older extant versions, this is considered the oldest well known example. Many early medieval manuscript illustrations have similarities with late Roman examples, which suggests that there were probably already pattern books for artists at that time. The subject of model books is an entire field of study for someone, other than myself. What I want to discuss here is the way these model books and other sources of available images may have affected the quality of ornament of a particular object.


Photo of the early 13th century Reiner Musterbuch from Wikipedia.
On the left page are examples of leaves like those found in metal-work,
illuminated manuscripts, and carvings, among other things; on the
right are patterns similar to those carved, painted, or inlaid on
chest fronts of the period


There is quite a difference between "seeing" something, and "observing" the same. When I was in high school, many of my classmates liked to draw cartoons, patterned after their favourite style of comics. They were able to re-create very believable copies of these drawings, but at the same time, most of them were not able to draw even the simplest of objects such as a chair or an apple with any sort of noteworthy accuracy. The reason is that they were 'observing' the details of their favourite cartoons, but not those of the apple.

Much of the art created before our modern era, with its notion of the free-spirited artist, was taught and practiced to styles and tastes established by the workshops which they were employed in; overall trends and tastes in society further contributed to the look of any given period of time as well. Much like most automobiles of any particular decade before the 1990's had a very distinct style which made it readily date-able to that era, the art of  history is usually identifiable to particular periods because of the overlying styles which culture had established, and the workshops of all the various trades disseminated. The Göttingen Modelbook, from which an illustration bellow demonstrates, shows one way that this sort of period-specific universal style was spread. The basic styles and techniques outlined in that modelbook can be observed in the paintings and illuminated manuscripts from much of Europe for a period of more than a century.


Göttingen Musterbuch, mid 15th century.
(Gutenberg Project)


This style was not limited to paintings and book illustrations, as the following two pictures illustrate. The same basic leaf form turns up in the foot of a large Swiss chest from the 15th century, and a 15th century German Altarpiece. As can be seen by these two illustrations, the craftsman had a wide range of interpretation in the actual appearance these forms could take on; this was partly determined by the type of work his shop was producing.
Foot of a Swiss chest, 15th century

Detail of a German Altarpiece in the Walters Art gallery, 15th century

There are a host of factors which might determine which of these two styles was produced by the artist making a piece of furniture; these could include the amount of time, and or money, that the client was willing to spend, the type of material that the craftsman was using, the level of skill he had, but most importantly, what sort of examples he had at his disposal for his models.

I often come across things written about this painting or that sculpture which "clearly shows the work of more than one hand", as in, the writer is assuming, based on the skill demonstrated, that two or more individuals were working on the same piece. This may, and probably is, the case in many instances, as a workshop setting would inevitably lead to multiple persons working on any given project. However, there is also the possibility that one artist had two separate sources from which he was relying on as his model.


My own carving, inspired by the casting shown below


This scenario occurred to me in the process of my own ongoing project. When I began my carvings, I was primarily relying on some small, not clearly drawn, illustrations from a 19th century book. I was not completely satisfied with the quality of my carving, as I felt I should be able to do better. I found a few castings taken from existing old work, which was available for purchase, and ordered them for the purposes of more diligent study of the techniques employed by the craftsmen who had originally made them. The difference this made in the quality of my own carving was remarkable.


A commercially available cast from a 19th century copy of a
16th century work

This observation of my own work led to further conviction that my earlier notions of the quality of ornament, throughout the Middle Ages, was as much influenced by the creating artists' proximity to urban centres and good sources of quality work, as to any other factor, such as skill, or financial incentive. Most of the time, when we see a work that is not "well executed" we assume that a lack of skill on the part of the artist is to blame, but perhaps the fact that he had nothing more than a simple stylised drawing to go by, and all the other carvings in his region were also of similar quality were equally contributing factors.


Two ivory panels depicting the same scene, and clearly
inspired by the same source, but what was the source,
and what other carvings did the first artist have to go by?


Compare the above depicted carving of mine, with the quality of one a did only a couple months earlier, but with no three dimensional or photographic example to go on, and you will see how important the quality of a model is to an artist. No matter how skillful the artist may be, if he generally cannot go far beyond the things he has surrounding him as model sources.


Videre Scire


Sunday, February 7, 2016

Carved Moulding Update - VI

This Post will mainly be photographs of my ongoing moulding project. I have gotten quite a bit of work done, and have a lot of pictures to add, so I will minimise the text and let you enjoy the pictures. The project has a way to go, before completion, but it is reaching a point in which one can easily envision the completed product.


I had one more master carving to do to complete the cast mouldings for these
rooms. Here is the centre section of that carving, ready for the mould process.
I made this group in three sections for reasons which will eventually be clear.

Here the entire group is drawn and the cut-out process
has begun

Left leaf group finished; ready to begin the right-hand piece I always try to
push myself, to make each new thing more complicated than the last. I like
the challenge, and therefore, this set is more complex than any of my previous
carvings for this project.

To help with the moulding process, it is useful to add a finish to the parts
before applying the mould rubber

Detail of the leaves

Second layer of mould rubber applied

Third layer of rubber

One mould removed from the mother part.
A plaster reinforcement shell is needed to maintain
the mould in its true form.


For ease of handling, there are three separate sections
the blocks are added to fill up unnecessary space and
reduce the amount of plaster needed


The first set of leaves, assembled for a straight application (over the doorways)

The same set, rotated on the scroll ends, for use on an arch; this is why
I made them in three pieces. I will cut the tips off and re-attach them
to follow the curve more closely as well.


One of my "followers" asked me the other day how much plaster I have used in this project so far. That is not an easy answer to give, because I have been using several different types of plaster. Some of it has been for moulds, some for the mouldings applied to the walls, and some for plastering the walls themselves. I did a calculation yesterday morning, however, and I seem to be nearing the 200 kg mark. I know I will have to buy a couple more bags this week, as well.That is a lot of plaster.


Moulding the baseboard with black cement

The baseboard in this area of the house is made of polished black granite. Originally, there was no baseboard in the niches; the plaster simply joined the floor. With my reconfiguration of the wall, in order to achieve the double columns I was after, it was necessary to remove the short sections of granite base. I took the opportunity to make a new baseboard which would go right around the base of the columns and the niches. This would have been extremely expensive, and nearly impossible with granite, but I had the idea of making a form, poring in black cement, and then finishing it up to shine like the  stonework. In the picture above, you will see the freshly cast base as well as the unfinished columns. The plastic was used to cover the cement to trap moisture and prevent it from drying too quickly which would have caused cracking. I also put wet rags on top, before covering it.


In this picture can be seen the second niche with the
straight section of cap moulding already applied.
I had to do some more of my wet plaster moulding
as was featured here to create the cap moulding for inside
the niche. Also note the arched moulding, at the head of
the niche, as was featured in that post.


This is not a diorama of Stonehenge. These blocks will keep the form in position

A flexible form to serve as the wall of the niche, and a pivoting template to
create the moulding My Friend Thomas took some pictures and video of me
making this moulding, and if he puts them on You Tube, as he says he will,
I will add a link for it.

Completed cap moulding, ready for paint. (Note; the cement polishing process
is not yet complete) 

Niche 1

Niche 2

Detail of arch terminal (painting not yet finished)


One of the advantages of being a sculptor is that I am not limited to the forms which my castings have. I needed to add additional ornaments to the ends of the arches, so I re-purposed part of one of the castings I used for the frames, but it did not have enough 'weight' to it, so I added more plaster and free form sculpted the leaves on the lower side of the scroll for each end. No two are exactly alike, but they all look the same, in general. Actually, this is how original 18th century "stucco" mouldings were done; the plaster was applied wet and then sculpted on the spot. I have done a bit of it in a few other places, but it is even more time consuming than the way I am doing it with the moulds.


Here is a detail of the large centre ornament which I was carving whilst at my show
in York, (featured in my 20 December posting).

Detail of one of the small centre crests


When one is at the job every day, it does not always seem that much progress
is being made, but this is how the situation looked in mid November


Here is roughly the same view taken on Friday 5 February
(don't worry, these newel posts and balusters are up next for a change)

Another view under the stairs. The final treatment of the large wall
behind the stairs is still a matter of discussion, and thus not yet painted.


The clients and I were all getting sick of the paper on the floor here in the passageway, so I made a great effort on Friday (ie 14 and 1/2 hour day) to finish up enough to be able to remove the paper. There is yet more work to do, but not much mess to make, so a drop cloth will be used wherever I am working from now on. These clients are terrific with their patience as far as my working in their house every day, at the same time they are living there, is concerned. I have been in houses before where my welcome became understandably thin on long projects. Most people do not want their lives interrupted by strangers in their house, day in and day out, for months on end. So far, these clients are taking it in stride, for which I am very grateful.

Below are some additional photos of the work, as of Friday night.


Sunday, January 24, 2016

Making Plaster Moulding

The project which I have been working on for the past 4 months has given me a chance to practice a lot of different skills that I have developed over the years, not all of which are actually related to furniture or woodworking. However, I am not just a furniture maker, I am an artist. One thing that I like about being an artist, is the chance to discover and try new techniques and methods of doing things.

Such has recently been the case, because I have been teaching myself how to make plaster moulding. I am sure that I read, many years ago, that this type of moulding is called "struck moulding", but I have been unable to verify that at present. Simply put, the process  consists of making a template out of a thin material (metal) and passing it over the wet plaster. There are a lot of subtleties to the process, however, and I am sure I have barely scratched the surface of discovering them. I have managed to figure out enough, though, in order to get the job done. Below are some photos of the process, and some of the resulting product.

To make a curved piece of moulding is much more challenging than making
a straight section; unfortunately, I needed arches, so I had to jump in at the
deep end. If  I were to start over with this, I would have made and arm which
pivoted from a centre point, but I did not think of it until after I was finished.


My regular readers will already be aware that another of the skills that I posses,
is that of metalworking. This skill comes in handy when one needs to make
templates. I first used a pair of snips to cut as much material away as possible.

I then used a file to finish up the shape according to the profile I desired.
There was no "right or wrong" for this profile because I invented it...

But this one had to follow an existing section of moulding; looks like it does.


Making the moulding cannot be done in one pass, it must be built up and allowed
to set before another layer can be laid down, otherwise there is too much material
squishing around. I put a section of rope into the wet plaster for strength.

After the second pass the moulding begins to take shape, but it is still not perfect.

The third coat is a thin layer spread out all over the moulding.

One final quick pass with the template makes a finished piece of moulding.
This is one half of the large flat arch going into the vestibule.
After three or four days it will be dry enough to crack free from the varnish which
I applied to the area of the table, covered by the plaster.


Sunday, January 10, 2016

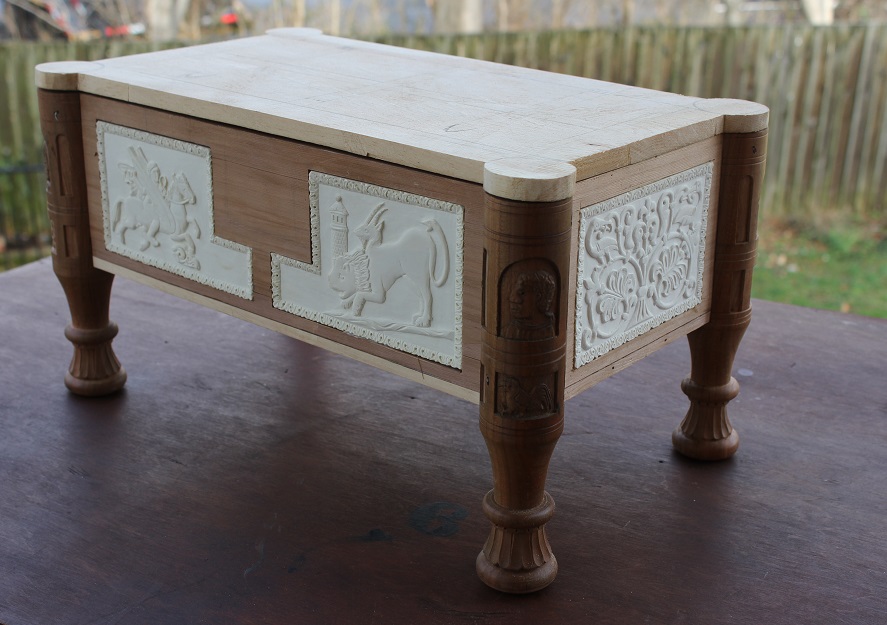
9th Century Ivory Box - Right End Panel

Happy New Year to everyone. I had intended to post last week, but my "real job" has been keeping me too busy. I also had to write an article for a tool collecting newspaper; thus, this is my first posting for 2016. How did we get here already. I remember as a kid in 1974 thinking 2000 was so far away I would never live to see it, yet here it is, 2016 already!


This 9th century box I have been working on is something very important to me, I see it as a mission to demonstrate that there can be more to re-creating medieval furniture than dug-out coffers and "six plank Viking chests" Even though I have been extremely busy with my paying project, ( I have been averaging 74 hours per week on it) I still want to keep the momentum going on this little chest. Taking a cue from the tortoise, even if the progress is slow, keeping at it will eventually result in the project getting finished.

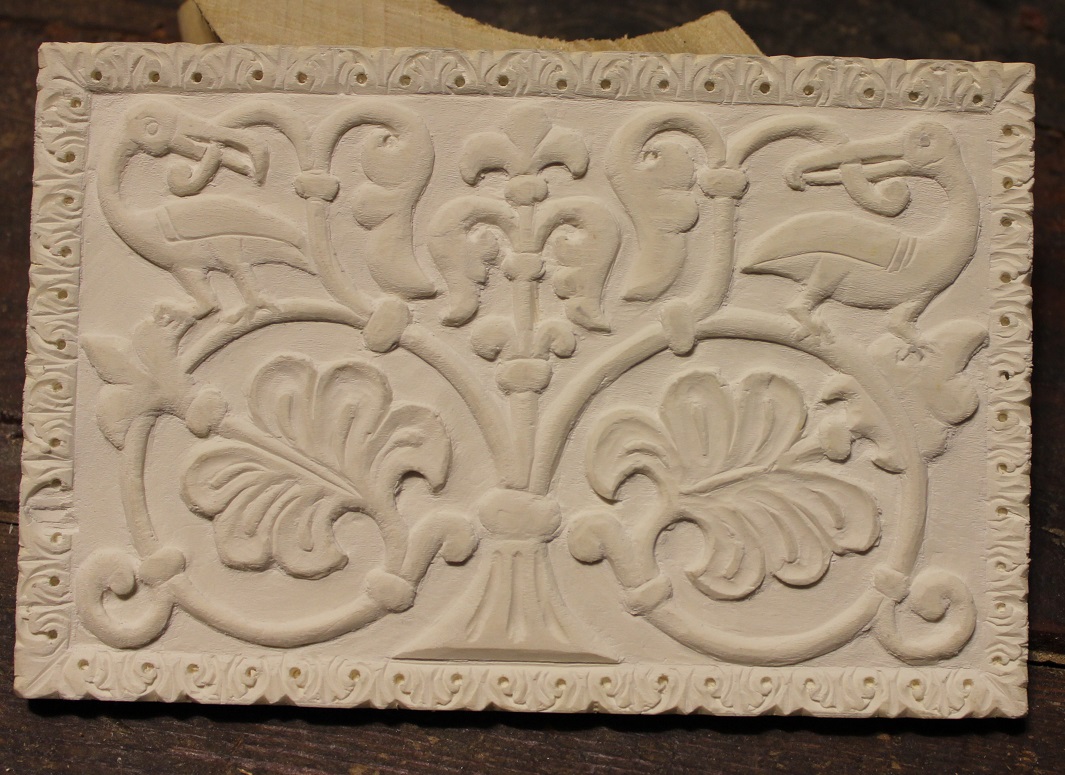
Over the past few months however, the progress has, by comparison, made the humble turtle seem to be positively streaking along. In October, when I went to take the class with Peter Follansbee, I took this panel with me, thinking that I could work on it in the evenings, and early mornings, but only managed to get the head of one bird carved before the last day of the class began. I again took it with me to my show in York, but most of my time was spent carving pieces for my job, and only on the last day, did I have about 4 hours in which I managed to get the rest of said, left-hand bird finished.

For Christmas, I determined to give myself a gift; namely the time to work on the carving again. Over that weekend I was able to get the rest of the vines and flowers carved, along with the second bird, but I still had to finish the border. I was able to get that finished, bleached out, trimmed to size, and inset, this weekend.


The bright sun really enhances the whiteness of my faux ivory.


This project has gone through a lot of evolution from my initial concept. It was originally to have been a box made all from holly, and, had I done that, it would be more than half completed by now. The first shift came, however, from my studying of several boxes which were constructed of some sort of wood with ivory panels inset, so I began making this box after that manner of construction. (For anyone reading this for the first time, I will repeat that my goal is to re-create an ivory box, but since ivory is a banned material, I have landed upon the idea of using bleached holly, which makes a fairly convincing substitute.)

Another factor in changing the construction details of the box, was the fact that the sides are a bit wider than a piece of ivory could realistically give. I have since come across a 10th century box which is about the same size, and the problem was solved by simply joining narrow strips to the panels to make them wider. At the time I began this project, however, I did not know if such methods would have been used, so I did not try to do that. I am going for a very convincing, and authentically constructed box, so if I have nothing to back up my methods, I will not use them.

Overall view of the box, viewed from the right


For some reason, I hate pictures of boxes or chests viewed from the right end, so to set the world right in my mind, I will put another view of the other end, which is the way I like to view rectangular objects.


Today was bright and the weather pleasant, so I thought it would make a
nice picture, unfortunately, it was too bright for the camera, so the details
are largely washed out. I guess I am better as a carver, than a photographer.

Up next is the back panel for this box. I have no idea when I will get finished with it, but will try to get working on it soon. This, and the top panels will continue the narrative of the story of Bellerophon and Pegasus, the subject of the front panels.


The back panel smoothed and ready to have the design drawn in.
It will be made from the centre material left from the ends
and front panel pieces. Just as with Ivory, the material is expensive
and not readily available, so care must be used to avoid waste.
I am able to get three layers of panel out of a single 25mm plank.