Sunday, May 31, 2015

Table Progress - Part VI


Ithe last episode of this table project, I was holding out for some more cool weather so I could finish my steam bending. I got what I was waiting for on 21 May, when the temperature only got up to 13 C! At the time, I had been working on cutting out the shaped ends of the table feet, as you shall see in a moment, but with a day like that, I dropped everything and got my bending forms, steam box, firewood, insulation, and everything else that might be required ready. That was a Wednesday, the prediction for Thursday's weather came true and I got to work early in the morning. 

At 5 in the morning I got the fire going and had water boiling in the tank by 8. At 11, a good friend of mine came over to help and we had the last three sections in the forms by 1,30. 

That is the short, abbreviated version, the actual version has been deleted do to language censorship. A couple pieces did not want to cooperate as well as I would have liked them to, so they required a bit of verbal encouragement; no cracking allowed in this shop! In the end, all worked out well, and the bending operation is over and was successful. 


An ancient wagon tyre made a good bending form
The outside frame for the top


Earlier, in the same week, I also planed flat the entire table top which had just been glued up in the last post; it turned out well, but required a lot of planing to get an even surface. (The pile of shavings in the picture is only a small fraction of what was actually produced.)


Flatting the table top


And now on to the main topic of this post; the feet...


It all begins with a big chunk of timber 220mm wide and 100mm thick.


This table is made of elm, but because these feet will be subject to bumps and bruises from chairs, mops, brooms, and everything else, I wanted to use a harder wood for them. I found this nice piece of American hickory; noted for its toughness, this should make very durable feet...even if it is not so easy to carve.


Two pieces cut to length

The profile is marked out and saw-kerfs are made to remove the waste


When I left home as a teenager, I landed a job working on a building site; we learned how to cut tenons by making multiple kerfs in the timber, breaking out the segments with a hammer, then cleaning up the faces with a chisel. When I started making furniture 20 odd years ago, this seamed to me the most logical way to do profiled shapes as well. If the timber is wider than it is thick, or thicker than 50mm this is the way I always do it; the 'right' method is often the one that works for you. (50mm or less in thickness can be cut quicker with a saw) I have no idea of what method one might have used "in period".

Faces cleaned and top edge moulding carved

Ready to begin carving the volutes


Though Vitruvius goes into great lengths to describe the proper method of designing a volute; as an artist, I just use my eye and sketch out what looks right. This method is sure to make any mathematician, architect or engineer groan, but it gets the job done. Once the design is to my satisfaction, I use an awl and make a series of points along the line, transferring the design onto the timber. Using the series of holes also helps because the form is still visible from the back side when I turn the pattern over to do the opposite end.


The spiral, pricked in with the awl, is clearly visible here

Roughing out the design


To carve these spirals, I choose chisels which have the same sweep (curve) as the section of the spiral that they span. I do a "stab" cut straight down, and then a couple gouge cuts to remove the chips. in this way, I work right 'round the entire design. Sometimes one does not have the perfect curve for a particular section; in these cases, a slightly less curved tool will do. Care must be taken not to go too deep into the intended exposed face when making the downward cuts.


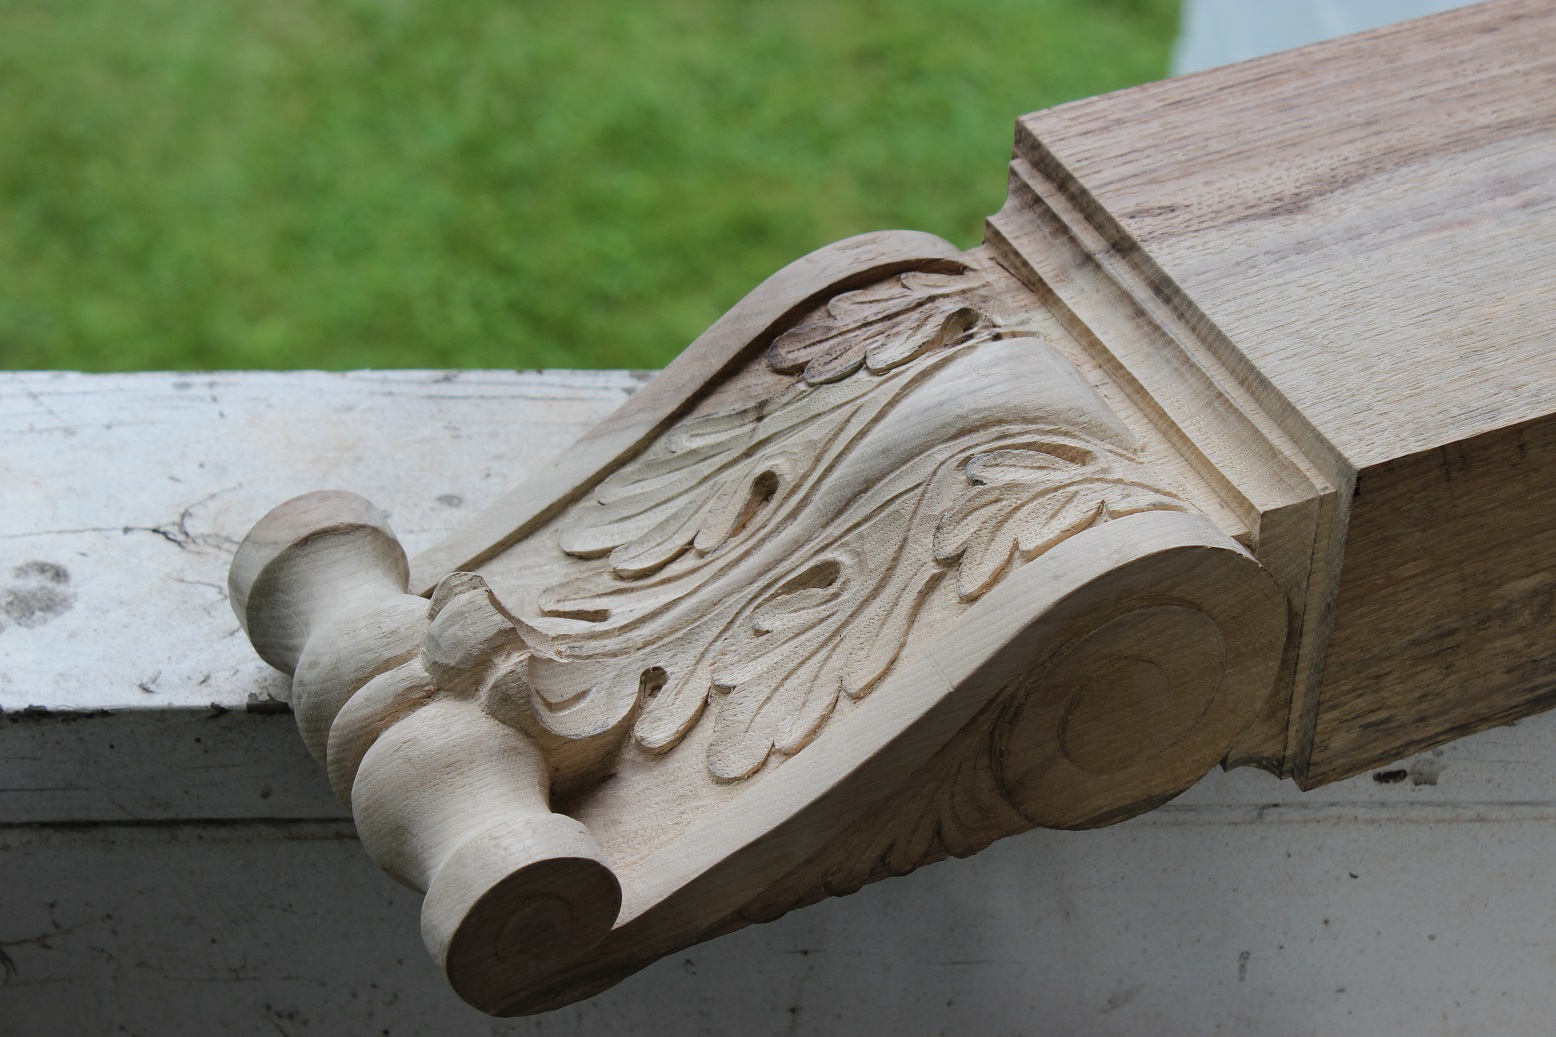
A finished spiral; this form is known in Classical architecture as a
modillion and served as an eave (overhang of a roof) bracket. In
the application as a foot, it is actually upside down.

Different day - different foot, but the same idea; this one showing the leaves
carved in between the scrolls. (I had both ends done before breakfast)

11 AM, breakfast break is over (two days after the previous photograph)
and it is time to begin carving the acanthus leaves on the second end.


Sometimes I feel more like a woodpecker than a wood carver, and the day I worked out this design was certainly one of those days. One cannot over-emphasise the utility of having a sample of what one wishes to carve. I had no such sample, so had to work like a woodpecker hacking, poking, and chopping until I found what was hidden in the blank of timber. It took me the entire day and several hours of the next morning to carve the end which is away from the camera in this picture. 

Once I had worked out the design, however, I made a paper template by rubbing over the carving with my finger. I then cut out the template, using the gouges which would be used to cut the wood, and then labeled each cut with the appropriate gouge number. In this way, I was able to make repeated and uniform shapes on all four feet.


The central 'vein' is drawn out free-hand...

then cut with a 'V' gouge.
After that, the remaining face is leveled and sunk below the surface
of the sides. This task of removing excess material is known as "wasting away".


I have a table with all my gouges laid out from smallest to largest in a shallow profile and a deep profile. I initiated this method to make it easier to pick up the tool I need without hunting for it in a pile of chisels as is visible in some of my photos from other projects. It is a good plan.


Keeping the tools (more or less) organised helps the work go more efficiently

Here you can see my paper template with the notations for the various
tools used for carving. I only needed to make half of the leaf, because the other
is a mirror image. I simply flip the paper over and draw the other side.


When I carved the leaf design on the side, it was simple enough not to need a drawing or a template, I knew which gouges to use, and approximately where to make the cuts. Carving a design as complex as these acanthus leaves was another matter entirely. Even if I remembered exactly which tool to use for every lobe, I would still mess it up, due to a mild case of dyslexia which gets me very confused when it comes to mirror images. I have made two rights or two lefts enough times to know that I need a pattern to guide me on things like this.


The sun is high overhead, and the first 'layer' of the leaves is set out

Now the sun is coming from the left, the day is wearing on; the carving
continues.
To the left you can see a piece of leather; this is charged with bee's wax
and rotten stone. I use it to keep my gouges very sharp; as a barber does
with a razor. With this method I only need to use a sharpening stone
on the rare occasion when I get a nick in the blade.


Chop down, cut under, chop down, cut under... and so the day goes. One tricky part of this is that the grain is running parallel the length of the timber; when one chops down at right angles to the face of the foot, it is actually at an angle running with the grain. Therefore, when it comes to the under-cut, it often happens that the chips do not actually get cut loose, as the two cuts have not intersected completely. This can lead to some aggravation, and increases the length of time it takes, compared to carving on a flat surface.

6 PM; the form is all there, now for the details and cleaning up work.


I have carved a couple other versions of acanthus leaf brackets before, but this was the first time I tried the upward curving 'tongue' at the end of the leaf. It has always looked a bit challenging, and it turned out to be so, as well; not so much in complexity, but in the time it takes to remove all the waste material around it. By comparing this picture with the last one, based on the angle of the sun, it took me a couple hours to finish this part up.


The memory of this foot was my model, but this
one has no upward curving end. (I did this one
in 2006)


7,30 PM and it is finished

A different angle for better lighting. I still need to do the underside of
the end reels.


When it takes 8 1/2 hours to carve the face of one foot, you realise you are not in this work to get rich. The work represented in these pictures took two full weeks of work (13 days) from dawn till dusk. I do it because I love it. Most people who get a job to make something, try to figure out the fastest way possible to get the job done and get paid. I do my work because I love it; the time it takes me to get it done is beside the point. Of course I try to improve my efficiency as I go along, and try not to waste time, but if my primary goal was money, I would find another profession. So long as I am able to pay the bills, and encounter customers who appreciate what I do, I will keep doing what I love; the way I love to do it - which is making things by hand.

Lighting is an important part of carving


This was foot number three, which I began about 6 in the morning, In this picture, it is about 9 and the sun is at the right angle to really show up every mark of the blade in the wood. The funny thing about carving, is that one can carve the whole thing under one source of light, and have it look perfect; only to turn it around, and discover a thousand flaws. The best way to get it looking good is to expose it to multiple angles of light. This fact is why, when the temperature is neither too cold nor hot, I like carving outside. As the sun makes its course through the day, the light changes, and I can go back and work the blemishes which show up under different lighting.


8 PM Saturday evening; three ends complete and the fourth under way
(the lower foot is darker because it remained all day outside in the sun)


To finish up, I use fine rasps, files, and small scrapers to smooth out the reels and the scrolls on the sides, the carving will remain as it is, save a bit of scraping with a small bit of a saw blade where there might be a bit too much tool markings. Overall, tool marks are what gives carving character and more appeal than machine "carved" ornament.

On Thursday night, after dinner, I finished carving the underside of the scrolls of the first foot, and did a bit of filing and scraping to give the reels a more finished look. Once that was done, I stood looking at it, and thinking how much like my 'child' the thing was. I then got a bit philosophical as I realised how much that was true; but on a much deeper level than I had originally been thinking.

Given however (too many) billion people in the world we are up to these days, the possibilities of your child being seen by more than the tiniest fraction of the population is nil. Of those who do see him or her, for the majority, he will only be a nameless face in a crowd. Others may see a boy or a girl; man or woman but nothing more than that. An even smaller number of people might take the time to notice a girl on a swing, a man on the corner with a newspaper, or someone driving in a big hurry to an unknown destination.

It will be the tiniest of all fractions of people who actually get to know Hans, or Maria, Peter, or Ingrid, on a personal level of some degree or other. In the same way, most people will never know my table exists, for others, it will be nothing more than that; a table. A few might get to actually noticing a foot on the table, but no one will know that foot; that child, as well as the parent. Only the parent knows all about its history, it flaws, and the labour and energy spent in its creation.


Videre Scire


Sunday, May 24, 2015

The (long and complex) History of Medieval Chairs - Part II; Plinth Chairs

It is nearly impossible to give adequate coverage to almost any topic which covers 1000 years and an entire continent. It will be my attempt in this blog posting, to give more coverage to the topic noted in the title, than that of any book on furniture history that I have ever seen; especially since I have never come across any discussion of these plinth chairs. Although they are the most common single form of seating apparatus depicted in medieval artworks, up to the beginning of the 15th century, as far as I know, the history books are entirely silent on the topic. I have a few books in which illuminations from manuscripts have been reproduced, depicting this seating form, but the authors very casually mentions them as "chairs" and give no acknowledgment to the fact that they are very different in form to what we think of today as a 'chair'. In this blog posting, I will begin to shine a bit of light on the long and varied history of this type of seat-form.


St Luke, from a Gospel Book, 3rd quarter 9th century
A very classic example of the plinth chair


In the first part of this article, I mentioned the pre-medieval origins of chairs in general. There is also evidence of the plinth chair from the classical world, but we find an interesting twist to the subject; there are very few portrayed in the Roman period. I have seen Greek and Egyptian examples in their respective artworks, and, when searching for Roman examples today, I came across several from the artworks of early Mesopotamian cultures, including this one below, from the Louvre.


One of the many illustrations of a plinth type chair from
the middle eastern cultures of the 2nd millennium BC 


After seeing a couple pictures like this on the internet I got out some of my books, and discovered that I had forgotten a lot about what I had previously studied. Back when I was in high school, I wondered what came before the classical art of the Greeks, and began studying Mycenaean, Minoan, and Sumerian cultures. Hmm, sounds a bit like my more recent approach to the early Middle ages...


As I was looking for Roman examples of this type of chair, and not finding many, I remembered having gone through this exercise a few years ago. What I find is that there are very few illustrations that clearly show this form of seat. There are several examples that could be, but nothing clear and definite. There are also lots of similar objects which have short legs or feet, so are not actually 'plinths' as technically defined (having a moulding 'round the base). At the same time, one does see many objects of this form, but they are altars, not chairs. I think, the last time I was doing this research, I came to the conclusion that, because a plinth chair and an altar had the same basic form, the artworks did not often depict people sitting on such objects. This is a highly conjectural conclusion, however, and would need a lot more research than I have given it, to draw any firm conclusion on the matter. Furthermore, in the Early Medieval period, many altars still retain this plinth form, yet the manuscripts also show seated figures on such objects.


A plinth chair form, but this is an altar, not a chair.
Roman, 3rd century
from Wikipedia


In the past three weeks, in preparation for this posting, I have gone through 7909 illustrations from medieval manuscripts, and separated out 723 illuminations which depict one or more of these plinth chairs. As I said, they are the single most common type of seating form, up until the beginning of the last century of the Middle Ages. These chairs are sometimes depicted in a detailed and realistic manner; at other times, they are quite abstract and it is even difficult to decipher exactly what the artist had in mind when he produced the illustration. In addition to the manuscripts, there are scores of relief sculptures, full figure ("in the round") sculpture, metalwork, ivory, and frescoes (as well as paintings after the 13th century) which depict this form of seat.


Christ Enthroned on a plinth chair.
note again the more simplified ornamentation of the chairs depicted
in a smaller scale.


One of the most elaborate depictions of this type of chair is pictured above; it comes from the west portal tympanum of the Collegiate Church of St Benoit Sur Loire, in France. The edge of the seat and the cove mouldings are completely covered in carved vegetal ornament; the side panels and base molding are further ornamented with pierced arcading. By contrast, one of the simplest depictions is pictured below. There are even more simplified drawings; simply a cube form, but this one retains the notion of a plinth, whereas a cube could represent anything, even simply a block of stone.


Bern Burgbibliothek, Cod 264 zt. 120 ca 900
several different forms of seating, all very abstractly drawn
Note another variation, with the integrally constructed footrest.
(click image to view larger and read notations)


I have already mentioned a near complete lack of depictions of this chair form from the classical Roman Period, but by the onset of the Medieval Period, they have become quite common. I mentioned, in Part One of this article, that the Ashburnham Pentateuch has this form of chair, but, on studying it again, more carefully, it does not; the closest things to plinth chairs are objects like the one occupied by a king in the above illustration, or are of plinth form, but have a back crest with a drapery,(contrary to what I mistakenly said in the previous article). However, in the Louvre, and coming from roughly the same time period, (6th century) is a pair of ivory panels, which is known as the Nine Muses Diptych. (One panel of which is missing; there are only 6 muses pictured, the third panel, originally making it a triptych, has been lost.) In this ivory, there is a seated figure representing a poet. Interestingly, he looks very much like the figures in the evangelist portraits of many of the 8th and 9th century Gospel Books.


A poet, attended by his muse, sits on a plinth chair from a
6th century Italian ivory panel, now in the Louvre.


In the earliest part of the Middle Ages, this plinth chair had a very distinctive, 'plinth' form, but as the centuries wore on, and tastes changed, the chair took on other slightly altered forms as well; all in keeping with contemporary trends in design and taste. Discernable by the middle of the 10th century, a trend emerged, in which the chair had a layered or stacked appearance to it. This form seems to have reached its zenith by the middle of the 13th century, but by that time, another, almost chest-like form had come to supplant it. (As with most trends in furniture styles of the Middle Ages, one can find two centuries, or more, worth of overlap between these two ideas.)


St John (recognised by his attribute, the eagle) 10th century
Hessisches Landesmuseum Darmstadt
Early depiction of the layered effect


Here is another example, from about 300 years later.


BL Burney MS 3 fol 5v ca 1240-50
Technically a bench,not a chair, so this should be in a future post on
benches, but this shows the extremes of the layered and cantilevered
designs that fashion thought up.


By contrast, this miniature, also from the same period as the last, shows a very simple straight-sided example with almost no overhang at all.


Bibliothèque de l'Arsenal, 5211 fol 3v 1250-4
Christ is seated on a plinth chair, ornamented in three rows of panels with
white dots, most likely representing carving.
At this time the plinth chair has begun to take on more of a 'chest' form.


Of course this is somewhat of an over simplification of the topic, and only represents one variation which is a bit more pronounced than some others. In reality, there are scores of types, regional variations, and stylistic nuances unique to each artist. One could write an entire book for each century on the topic, but most people would, doubtless, find that extremely boring reading.


In short, however, these chairs could be rectangular, square, or even round; they were carved, painted, covered in gems, and imitation gems, metal foil, and moulded gesso. They could be of an enclosed box form, or be constructed of open arcading and tracery. They sometimes had short lips to retain their cushions, and often had very pronounced overhangs to the seat. Sometimes they took on purely sculpted forms, and in the 13th and 14th century, at least, could even have 'ears' or tree branch looking extensions coming from the rear corners. I have observed this in enough different artwork of two centuries, to realise this must have been a real fad, not just one artists whimsical notion.


Madonna and Child, from the Met. I4th century
Usually these sculptures are depicted in a frontal
view so one never sees the chairs they sit on.
5 sides of an octagon with Gothic tracery


Though I have just mentioned some less 'plinth-like' varieties that these chairs often took on, over and over through the centuries, we see other examples proving that the basic plinth form was extremely long lived, and never seems to have gone out of fashion, Although, based on a less frequent occurrence in the 15th century art, these chairs became less popular, they still seem to have sailed right on out the near end end of the Middle Ages. I have not spent a lot of time sifting through 15th century manuscripts, my searches usually stop with the 13th, nonetheless, I still have quite a few examples of this type of chair from as late as the later half of the 1400's.


BL Harley MS 1340 fol 15r mid 15th century
since this one is depicted as being made of stone, certainly no one can
mistake it for a chest.


Once one has grasped the notion that these types of chairs were quite prominent throughout the medieval world, the logical question to ask, is, "Why do none of them seem to have survived?" This is a valid question, and I ask the same. There is no simple answer, but there are several possibilities.

One must first realise that, compared to the amount of all types of furniture, there are very few examples of any of it still extant. The items which did survive were, for the most part, things which found further use, down the economic chain of society or were stashed away in an attic, or were of some value due to association with (or later attribution to) a famous person. Chests were useful as storage devices, but if these objects were not primarily storage intended, they may have been less useful to succeeding generations. Another factor to consider is that, many of these items, if built like the choir stalls which have survived, would have been made out of extremely thick material, rendering them much heavier than their size warranted. 

Plinth chairs seem to have almost always been accompanied by a foot-rest and therefore the seat would have been higher than a modern chair. At some point, gradually, as with anything else, the fashion for sitting in an elevated chair with a foot-rest gave way, and most of the chairs that remained had their legs cut shorter to accommodate the changes in taste. It is not likely that this cutting down would have been very successful on a plinth chair, as its structure is entirely different to that of a chair with legs.


Cassone associated with Guliano da Maiano late 15th century
Is this a chest? I would have thought so, but perhaps it was originally a seat?

Lastly, though we tend to call anything that is oblong, of roughly box shape, and made of wood, a 'chest', in fact, in the medieval mind, there were many varieties of furniture type; all having a roughly 'box-like' form. Though as a valuables safe, a refrigerator, a gun safe, and a set of file drawers are all more or less 'cabinet-shaped', most of us would not consider any of them to be furniture. In the same way, a chest for money, one for swords and armour, and one for traveling, were usually not 'furniture' in the Middle Ages, (though modern museum setting often display them in such a way as to give that impression). In the same way, something that might appear to us as a chest, might actually have originally been intended as a chair. Most medieval depictions of chests show them as either being smaller than chairs, or at the height as a table or buffet. Things that are more or less chair height, probably were originally for that purpose. (except for the numerous examples which have had their legs shortened due to taste and or rot, in succeeding centuries.)


BNF Fr 2608 fol 449v
This looks to me a lot like the "chest" in the previous illustration.


Next time you are in a museum and see a "chest" which is missing its lower base moulding, and may or may not have a replaced top, but seems to be of seating height; consider weather or not you may in fact be looking at a plinth chair which, like its cousin the box chair, happens to have a convenient storage space in it as well.


French Gothic chest 15th century
Because the lock seems to have been designed into the overall scheme, this
is more likely to have been intended primarily as a storage item, but compare
it to the Seated Madonna above, and one sees the implications of what such an
actual chair might have looked like.


It is a shame that some magnificent plinth chair from the 9th or 10th century (or any other) has not been handed down to us, and the best we can do is speculate and guess as to their actual appearance. Nonetheless, the artwork speaks clearly enough, to inform us that not all furniture of box form had a primary purpose as storage compartments. The items we lump together and loosely term 'chests' had many varieties of form and function. One of those forms was a plinth chair.


Videre Scire


Sunday, May 17, 2015

Ivory Substitute?

In this post I had hoped to present part II of the History of Chairs, but the weekend schedule is too full to allow time to do that. On Sunday I will be attending an all day seminar presented by Kaare Loftheim, a traditional cabinetmaker whose work I greatly admire. There simply will not be enough time to get everything together for the chair topic. Instead, I will introduce another little project which is now in its embryonic stage.

This project first suggested itself to me in an unusual way, the idea came to me during the process of making some rolling pins from the wood of the holly tree. Holly is a very white wood, and has been used for centuries as inlay, exploiting that characteristic. After I had finished turning, carving, and polishing the rolling pin, it occurred to me that it looked a bit like ivory. I then began thinking that, perhaps, it could be used to create a small box in imitation of the medieval ivory objects one sees in museums.


carved and turned from holly


As anyone who has been following my blog is aware, my favourite period of the Middle Ages, is the 8th and 9th centuries, so it is from that period that I will look for inspiration for my box. Most surviving box type structures, from that period, have a gable roof shaped lid. Though this type is the most common, there are several flat topped examples as well; this is type I intend to make.


Brecia Casket 4th century
(found on the web)

The box pictured above comes from a time a bit before the medieval period began, but the same form still existed in the 9th century, as is evidenced from illustrations in several manuscripts of that era. Another form which seems to have come about, has the corner posts turned round, thus projecting beyond the main body of the box. A 12th century reliquary casket of St Catherine in the St Servatius Church in Quedlinburg Germany has this form, and will be the type model for my box. I have no idea when that form first appeared, but there are a couple other 12th century examples that I know of, so therefore it must have originated earlier than that.


top view, showing the form of the corner posts


These boxes, when carved in ivory, are extremely beautiful; sadly, due to the long-running ban on ivory trade, one cannot use it to make anything. Therefore, if one wishes to make something that looks like ivory, he must find a substitute. Though it is not perfect, I think holly will serve the purpose of providing that substitute. I did a test sample on a scrap that was cut off of the blank used to make one of the rolling pins.


a bit like ivory?


I have subsequently changed my mind about how I intend to ornament the box, so this piece will no longer match the design I have for it, nonetheless it did give me an idea about the challenges of carving this material in a miniature scale. I will probably wind up using it in another box, inset into the surface like the one below.

When one sees these boxes in pictures, they usually fail to comprehend the small size of the objects Ivory is not timber, and one rarely sees ivory panels beyond 140mm wide. Most ivory pieces one sees are between 70 and 100mm, in other words, not much more than the width of three or four fingers. Ivory is a hard material, nearly as much so as bone, therefore, though one cannot cut it with a carving gouge for wood, it can be scraped, which leads to the possibility, in the hands of a skilled artist, to achieve impeccable detail and accuracy. On the other hand, wood is less dense, and and therefore must be cut away in little slivers; it can also be scraped, but must be done so always keeping the direction of the grain in mind. If one goes against the grain, and, or, if the tool is not sharp enough, then the resulting scraping will only produce fuzz and muddle the work. This is why one rarely sees tiny objects carved from wood, and when they are, they are usually done in a very hard wood, such as boxwood, which is crisper, and more easily captures the finer details.


6th century wood and ivory box. I took this picture in the museum.
This end is about 300mm wide, so each ivory panel is only about
60-65 mm in width.
Notice that this box is dovetailed together!


As a substitute for ivory, holly offers a few positive, and a few negative advantages. The fact that it is white, being its chief drawing point. It is not particularly hard, however, so, though it may be easier to cut, it tend to be more difficult to achieve clean and crisp details. Another drawback, is that it has small medullary rays, which are very un-ivory looking, so one must be careful to avoid them. Also, since it is not very hard, it will not take a polish the way ivory will. I am still working on a way to finish it without making a thick layer of varnish and at the same time keeping it as white as possible.


Original inspiration 


My original idea was to make a box ornamented in a 6th century manner, with simple animal and geometric designs. I started with this drawing from one of my books, Early Medieval Designs from Britain. Half way through the test carving, I found a photograph of the actual metal object this drawing depicts. Initially, I had thought to make some sort of motif with these animals along the edge of the lid, but have not found enough variety of figures from the same period and geographic location to make a believable amalgamation of decoration. I do not fancy carving the same design 50 times over. (I tend to get bored carving the same design over and over, even if the end result looks pleasing.)


Sarre Brooch, in the British Musem
the original from which the above drawing was made


I carved the first animal in its entirety, once it was finished I was afraid to start the next one, so left it standing around for a few months. It would have been better to have carved them both at the same time, as this would have produced a more unified look. When I got around to working on it again, it seems my frame of mind was different, as can be seen from the variations in the details, Overall, I guess they look fairly similar anyway.


The first carving, done back in December (I think)


The second animal, carved this week. (I know)
notice the scale for size, these guys are each
less than 40 mm long.


On the first guy, I made a ham-fisted mess of his foot. On the second, the outline shape is too narrow, and cut too deep. (it actually looks worse in this photo!) Somehow, overall, I am still pleased with my first attempts at carving on such a small scale. What it has given me, is a sense of what is needed to create an imitation ivory box. A drawing of it, which I made this morning, is below.


Conceptual rendering of the 9th century style box
it will measure approx. 230x360x250mm


In the latest conception of this box, I intend to use the the First Bible of Charles the Bald, (produced in 845; [BNF Lat 1]) for all the decorative elements. There is enough variety of design to have plenty to chose from, and having all design elements originating from the same source, should give the box a genuine feel. One of the big problems with reproductions made in the Victorian period was that the craftsmen who created them took this element from here, and another part from there, and wound up with a hodge-podge which usually had a distinctly 19th century look to it. My goal is to try to produce something that looks believably 9th century.


Videre Scire