Sunday, June 26, 2016

Plaster Moulding Project- IX; Faux-Marble, the Finishing Touches

This project is coming to its end after many months of work. I have enjoyed the journey and all of the new things learned along the way. As with any sort of project one might undertake for the first time, there were things that I would do differently if I could start over, and there were things I wanted to do differently, but the clients wanted done another way. In the end, though, I am generally pleased with the results, and though it has nothing to do with furniture, I rate it as one of my best projects.


Four newly minted and installed  "marble" panels.


I usually call myself a "cabinetmaker", which is the proper English term for one who makes fine furniture, (not kitchen cabinets!) but lately I have been using the title "artist" much more frequently, as that is what I have been all my life. I do painting, drawing, sculpture, and woodwork. Not to mention the occasional metalworking project, or ceramics, hey, I even dabble in music a bit as well, that should definitely put me in the "General Arts" category, shouldn't it? 

My earliest and strongest passions in the arts, however, were furniture and painting, and these two fields are what I have spent the most time at over the past forty years. I have been painting since I was 10 and my artwork often involved buildings, ruins, and other architectural elements, so it was no real stretch for me to undertake the painting of "faux-marble" for this house; I have been doing it for years on a much smaller scale in my paintings, as you can see below.


A Cubist's Anticipation of Inspiration (2006)

Narcissist's Contemplation of His Search for a Key
Lost in Plain Sight
(2011)
(Just a gratuitous excuse to post a couple of my paintings)


The process of doing the panels began with some pieces of 3mm MDF, cut to the appropriate sizes. I had the idea of laying out a group of them on the work-table and painting them all as if they were one slab of marble, to expedite the process and to give a more uniform look the the entire project. Another reason for this is that when painting individual panels, the edges tend to look less involved than the centres do.


The process begins by sponging on lots of white paint
I used "milk paint" for this project. It is made from lime and powdered casein proteins, and is sold in dry form to be mixed with water as needed. I like this paint because one can achieve a vast range of colour and effect simply by varying the proportion of water. 

The whole "trick" to getting good marbling effects is to allow transparencies of many of the colours, and a "bleeding" of the colours underneath.

Here you can see the colour of the board showing through behind the white,
you will note even see this colour in the end, but its effect will be there
Beginning the second layer; a salmon colour.
(This was actually from the second batch of panels)
Two layers of salmon and a layer of light yellow applied to the first batch

The third stage of the process is the one which takes up the most time. This is the "veining" process, where lines and patterns are painted on with a fine brush. There are actually many brushes which are sold specifically designed for this purpose, and some of them might even be useful, but I just used and ordinary fine camel's hair brush. This veining business cannot be done in one go, as it will look extremely weak. The secret is to have various shades of colours and go over the lines two or three times, from the lightest shade to the darkest, (but never completely covering the previous application). Another step is to then go along some of these lines with a line of white. This whole process takes several hours, and involves holding the brush completely vertical and passing it over the surface with a wiggling motion whilst varying the pressure to achieve thicker and thinner lines. These colours were done with liquid type watercolours.

A section of veining after three passes with various shades made from mixing
burnt sienna, yellow ocher, and Prussian blue. 

Although the third stage is the most time consuming, it is the fourth stage which is the most crucial, because it is here that the magic happens. As you can see, the picture above does not have much of the look of real marble. That comes with the over-washes which are achieved in the forth stage. These are a series of light layers of (for this project) pale yellows, whites, and Burnt Sienna colours which mute and blend the underlying paint together.

The second set of panels after veining and applying five wash layers

My first batch wound up being a bit on the monotonous side for my taste. Any one panel looked nice and had the effect of real marble, but as a whole group, they looked too similar. For the second batch I spent more time paying attention to the real marble around me, and added some inspiration from the patterns I saw in them: the results were much more satisfying and evoked the comment concerning one panel in particular of "This one is a masterpiece!", from the client. It is nice when one's efforts are noticed and appreciated.

A close up of one corner of my "marble slab"
This is part of the first group which were a bit too monotonous for me
Just another reminder of the "before"
(Compare this to the next picture to notice that the
grid in the floor has also been re-done)
A nearly finished project. Only subtle details which
would not show up in these pictures remain


The project is nearly complete now. There are still a few details to be sorted out, such as the fact that the white moulding is still raw plaster and must be painted with a flat white paint. It will still look exactly the same, but this will give more protection to the plaster. Another detail will be the addition of a fine beaded moulding around the marble which will be painted gold as well; it will be the only other detail which will give any other truly visible change to the project. (well, it will make a big difference once they get some more paintings on the walls as well.)

Stay tuned for the next project in this house, which is to do a ceiling medallion and oval moulding decoration in the dining room. That project will commence in about a month, though I have already begun the carvings for it.


Sunday, June 12, 2016

Sometimes You might be Amazed...

Most people have pre-conceived notions about many topics; the Middle Ages is one of those topics that many of them share the same basic prejudices about. We have been over them before, but for the sake of a refresher, they are the notions of "crude, primitive, simple, rudimentary" etc. being applied to almost every aspect of medieval life. One only need watch a modern movie related to anything pre-14th century to get a sense of the "average" persons notion of the level of craft and creativity of this period in history. Almost every single object is portrayed as being about two steps removed from what one might expect of Neanderthal Man. (though he was probably more sophisticated than we give him credit for as well!)

Because of our collective mentality of what things must have been like for most of the Middle Ages, sometimes one comes across something that completely astonishes these pre-conceived notion. Perhaps such is the case with something that I have been 'tripping' over for a couple years, but have not taken the time to do much research on yet. This topic which I am referring to is that of lathe turned stone columns and balusters which were apparently made throughout most of the medieval period.


7th century lathe-turned baluster fragment, Durham Cathedral

I have no intention of going into depth on the extent of this art, nor the particulars of the methods employed in its execution in this post. As already stated, I have not even done much research on the topic. What I wish to share here are some of the images which have come to my attention and to point out that this practice completely flies in the face of the "crude" and "primitive" nature of early workmanship and industry. I have no idea how this type of work was accomplished, but I think it safe to say that it would require quite some level of mechanical sophistication.  I will go one step further and point out that although there may be almost no turned wooden work surviving  from the early Middle Ages, (There are many turned objects which have been recovered from grave sites of the 6th-8th century in Trossingen, Germany which include ornamentally turned parts) one can deduce some of the forms they might have taken by observing these turned stone pieces.
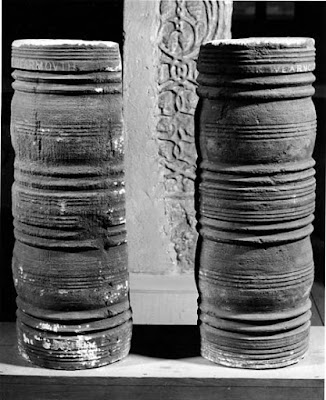


7th century turned stone balusters

I first came across a picture of these 7th century turned balusters through the website of Durham University, which is dedicated to the research of Anglo-Saxon stonework, It seems that these fragments were discovered around 1830 walled up inside of a small niche in a tower and had remained there for hundreds of years. Because of their relative lack of exposure to the elements, the original surface is fairly well preserved and one can see that they were well made. These pieces are made of dolomite which is slightly harder then limestone, (MOHS 3.5-4 vs 3) so this is not a stone that can be carved with a pocket knife.

Many are fascinated with the Far Eastern 12th century ruins of Angkor Wat and other such places; they marvel at the ingenuity of the craftsmen who created these structures. (rightly so) but fail to realise that most of the same stone working techniques were used in Europe as well. Many windows of these Asian temples have turned stone balusters in them, demonstrating that the practice must have been very ancient and universal.


Lathe turned work of the Late Anglo-Saxon period from Kent, 10th-11thc


There are other turned balusters from other parts of the UK, of various dates, such as these (apparently) from the former St Augustine abbey of Canterbury, which I found through a very detailed website dedicated to the architectural details of Anglo-Saxon England. They demonstrate a fine sense of proportion and balance in their design, and show that the practice was widespread over the English Isles.(Durham is in the far north-east of the England, whilst Canterbury is in the extreme southeast)

There are many other turned shafts and columns throughout England including these from Monkwearmouth. Notice how weathered they are from exposure, yet for half of their lives, (7th-14th centuries) they were completely inside of a building.

Monkwearmouth Church balusters 7th-8thc

I mention this because I want you to compare them to other similar balusters of the same date which have had much less exposure to the elements. This is important to note when one is considering the "crudeness" or lack thereof, in stonework of medieval origin. Perhaps much of what made it "crude" was 1200 years of weathering.


Notice how crisp and clean the details of these turnings are

This craft was in no way limited to the UK either, as this 14th century balustrade from San Zeno, Italy, demonstrates.


14th century balusters from San Zeno Cathedral

I am sure there are hundreds more examples in existence throughout Europe, and thousands more which have been destroyed over the long wear of history since they were created. For me, their study serves in two capacities. The first, to reinforce the truth of the fact that in all periods of history men have been clever and skillful craftsmen and have produced untold thousands of wonderfully beautiful objects in every form of art. The second, by comparing durable objects, such as these stone items, with medieval manuscript and mural images depicting such elements, one can draw a tentative analysis of the actual details which must have been applied to wooden objects as well.


Videre Scire