Showing posts with label plaster moulding. Show all posts

Sunday, January 27, 2019

...and so begins another year

I have not had much time to post anything on this blog lately and probably all of my readers are wondering what I have been up to.

The answer is that I have been very busy trying to get this room finished up for the client by the end of the month. I still have a ways to go, but am making progress.

Here are a few pictures for those who have been clamouring to see.


I forgot to take a picture before I started, but this is one just after things
got going. The big plywood boxes are full of the plaster cornice segments


The short answer is carving, painting, gilding, and finishing.

Once this room is finished I will put up some more pictures...stay tuned.

Sunday, November 13, 2016

Dining Room Project - Part the Last

It has been a busy couple of weeks finishing up this dining room, but the results are rather pleasing and the clients seem very delighted with the results.

Fireplace and mirror, seen looking towards the bar

View towards the kitchen

Kitchen two-way door

The ceiling. Unfortunately this picture does not convey the way the sky
seems to glow with the chandelier lit up. Seeing that was a very pleasing
surprise the first time the light was turned on after it was installed

A reminder of what the room used to look like;
the chandelier looks so forlorn hanging there by itself

Finished mantel and mirror

Monday, September 19, 2016

More Moulding and Painting; Part I of II

I have moved to another room in the house in which I have been doing the moulding project for the past Year. This time I am working on the dining room. It is not nearly so involved as the last project, and thus I will only be doing two posts on this one; this post, and again when it is finished.

The project entails putting up some mouldings on the ceiling, making a medallion and painting it, and re-doing the fireplace mantle. (Plus a few other odds and ends.)


A simple painted medallion. At least you will not find this one on one of
those Chinese import sites for a ridiculously cheap price. 
I used a sheet of cement board to make the medallion, applied the cast ornaments, (reworked from ones used in another part of the house) then cast and carved the connecting bars free-hand on the medallion. I used a couple sections of flexible moulding to make sections from which to cast the plaster pieces for the ceiling, and I carved, moulded, and then cast the 42 leaves needed to complete the design.


First stage of painting. I am using "Old Fashioned Milk Paint"


Left and right leaves

40 of 42 leaves cast in plaster, I do not remember why the other two did
not want to have their picture taken.


I first drew out the ceiling life sized on the floor of my shop. In order to draw an ellipse one needs to know the length and the height. Take half the length and multiply it by half of the width; divide that number by its square root, and that gives you the distance to place your pins (called foci) from the centre point. Use a string looped around one point and tied (forming a loop) exactly at the distance to the extreme tip of the ellipse. Take a pencil and make a notch in the edge, near the tip, and describe your ellipse. It sounds so simple but it took me nearly a day to work it out. I then kept the string, took notations of all the measurements, and duplicated the same ellipse on the ceiling so that I would have a guide to install the plaster moulding. It worked out brilliantly.


A picture found on the internet of the method of drawing an ellipse

Of course before any of the drawing or adding moulding or anything could take place I had to make a work platform. I built this right over the dining room table because it was so big it would have been a huge challenge to move it anywhere else. Working on a ceiling for very long in any position gets to the neck; one really has to feel sympathy for all the painters over the ages who laboured for years doing the magnificent frescoes one finds in palaces, churches and cathedrals.


My working platform; the planks can be moved to wherever they are wanted

As of Friday half of the leaves have been painted gold. The border around the medallion will also be gold, and there are a couple more appliques which go at the ends. This week I will begin working on the fireplace mantle. In a couple weeks I should be posting the completion of this project.


Sunday, June 26, 2016

Plaster Moulding Project- IX; Faux-Marble, the Finishing Touches

This project is coming to its end after many months of work. I have enjoyed the journey and all of the new things learned along the way. As with any sort of project one might undertake for the first time, there were things that I would do differently if I could start over, and there were things I wanted to do differently, but the clients wanted done another way. In the end, though, I am generally pleased with the results, and though it has nothing to do with furniture, I rate it as one of my best projects.


Four newly minted and installed  "marble" panels.


I usually call myself a "cabinetmaker", which is the proper English term for one who makes fine furniture, (not kitchen cabinets!) but lately I have been using the title "artist" much more frequently, as that is what I have been all my life. I do painting, drawing, sculpture, and woodwork. Not to mention the occasional metalworking project, or ceramics, hey, I even dabble in music a bit as well, that should definitely put me in the "General Arts" category, shouldn't it? 

My earliest and strongest passions in the arts, however, were furniture and painting, and these two fields are what I have spent the most time at over the past forty years. I have been painting since I was 10 and my artwork often involved buildings, ruins, and other architectural elements, so it was no real stretch for me to undertake the painting of "faux-marble" for this house; I have been doing it for years on a much smaller scale in my paintings, as you can see below.


A Cubist's Anticipation of Inspiration (2006)

Narcissist's Contemplation of His Search for a Key
Lost in Plain Sight
(2011)
(Just a gratuitous excuse to post a couple of my paintings)


The process of doing the panels began with some pieces of 3mm MDF, cut to the appropriate sizes. I had the idea of laying out a group of them on the work-table and painting them all as if they were one slab of marble, to expedite the process and to give a more uniform look the the entire project. Another reason for this is that when painting individual panels, the edges tend to look less involved than the centres do.


The process begins by sponging on lots of white paint
I used "milk paint" for this project. It is made from lime and powdered casein proteins, and is sold in dry form to be mixed with water as needed. I like this paint because one can achieve a vast range of colour and effect simply by varying the proportion of water. 

The whole "trick" to getting good marbling effects is to allow transparencies of many of the colours, and a "bleeding" of the colours underneath.

Here you can see the colour of the board showing through behind the white,
you will note even see this colour in the end, but its effect will be there
Beginning the second layer; a salmon colour.
(This was actually from the second batch of panels)
Two layers of salmon and a layer of light yellow applied to the first batch

The third stage of the process is the one which takes up the most time. This is the "veining" process, where lines and patterns are painted on with a fine brush. There are actually many brushes which are sold specifically designed for this purpose, and some of them might even be useful, but I just used and ordinary fine camel's hair brush. This veining business cannot be done in one go, as it will look extremely weak. The secret is to have various shades of colours and go over the lines two or three times, from the lightest shade to the darkest, (but never completely covering the previous application). Another step is to then go along some of these lines with a line of white. This whole process takes several hours, and involves holding the brush completely vertical and passing it over the surface with a wiggling motion whilst varying the pressure to achieve thicker and thinner lines. These colours were done with liquid type watercolours.

A section of veining after three passes with various shades made from mixing
burnt sienna, yellow ocher, and Prussian blue. 

Although the third stage is the most time consuming, it is the fourth stage which is the most crucial, because it is here that the magic happens. As you can see, the picture above does not have much of the look of real marble. That comes with the over-washes which are achieved in the forth stage. These are a series of light layers of (for this project) pale yellows, whites, and Burnt Sienna colours which mute and blend the underlying paint together.

The second set of panels after veining and applying five wash layers

My first batch wound up being a bit on the monotonous side for my taste. Any one panel looked nice and had the effect of real marble, but as a whole group, they looked too similar. For the second batch I spent more time paying attention to the real marble around me, and added some inspiration from the patterns I saw in them: the results were much more satisfying and evoked the comment concerning one panel in particular of "This one is a masterpiece!", from the client. It is nice when one's efforts are noticed and appreciated.

A close up of one corner of my "marble slab"
This is part of the first group which were a bit too monotonous for me
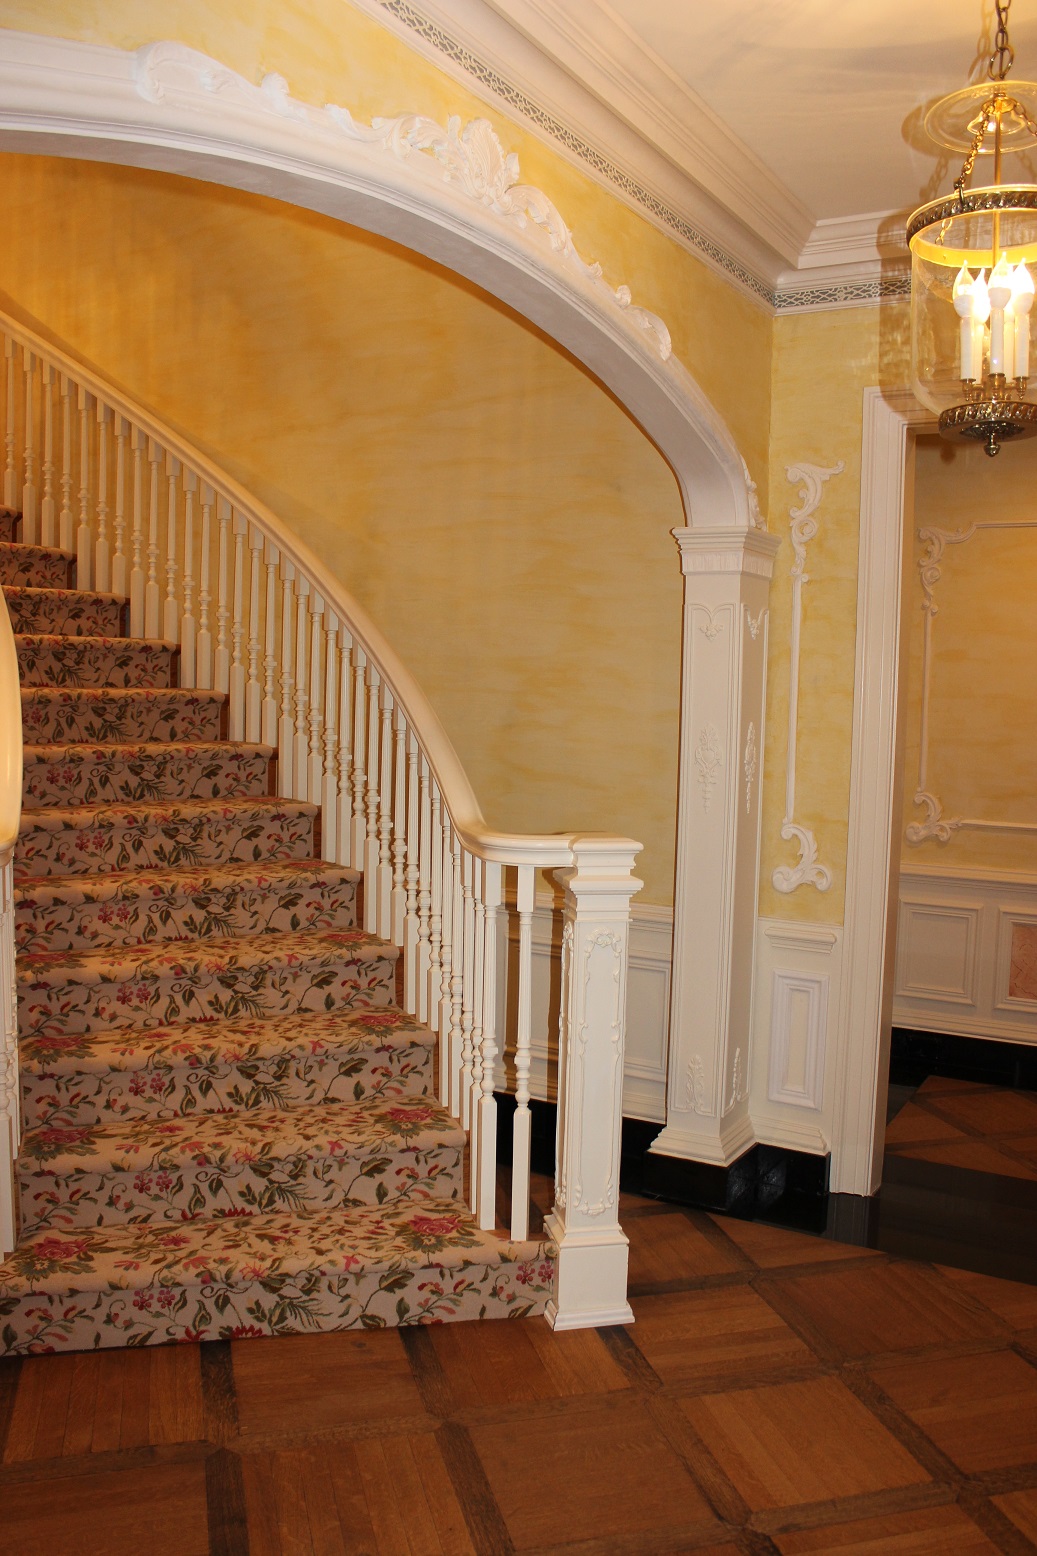
Just another reminder of the "before"
(Compare this to the next picture to notice that the
grid in the floor has also been re-done)
A nearly finished project. Only subtle details which
would not show up in these pictures remain


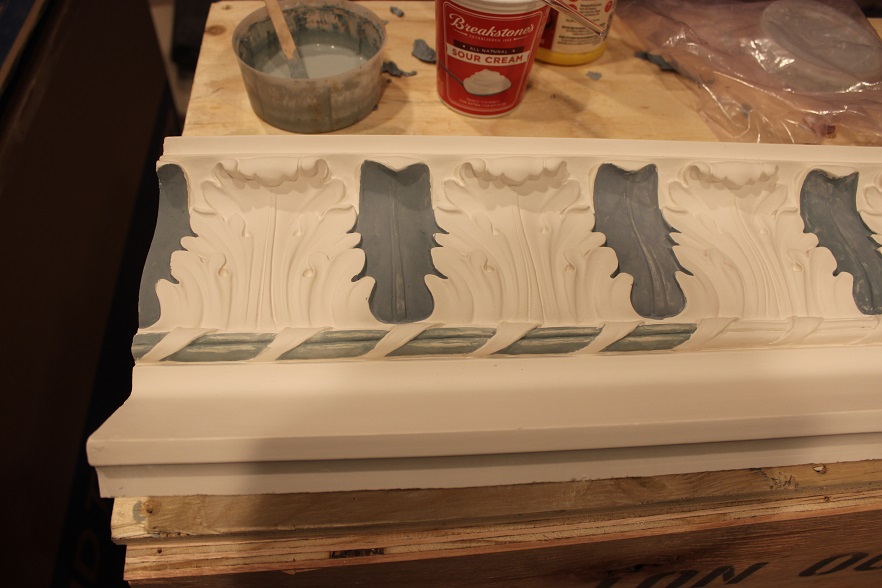
The project is nearly complete now. There are still a few details to be sorted out, such as the fact that the white moulding is still raw plaster and must be painted with a flat white paint. It will still look exactly the same, but this will give more protection to the plaster. Another detail will be the addition of a fine beaded moulding around the marble which will be painted gold as well; it will be the only other detail which will give any other truly visible change to the project. (well, it will make a big difference once they get some more paintings on the walls as well.)

Stay tuned for the next project in this house, which is to do a ceiling medallion and oval moulding decoration in the dining room. That project will commence in about a month, though I have already begun the carvings for it.


Sunday, May 29, 2016

Plaster Moulding Project - Update VIII; A Big Transformation

Since returning from my trip abroad, I have gotten back into the moulding project, and the past three weeks of work have made a  big impact on the appearance. Following are some pictures of what has been done and some of the stages along the way.


Gold paint on the over-door ornament. This extra long ornament began with
the same castings over the other doors, but I extended it by sculpting  sections
of wet plaster right there on the wall.

Before the gold paint was applied, a layer of red oxide primer was added. This simulates the red "bole" used in traditional gilding, and is the red-orange colour one sees when old gilding has gotten worn. It adds a richness to the overall finish that is not achieved if the gold is painted directly onto the white surface.


The red-oxide under-paint


In most traditional 18th century work one sees of this nature, all of the moulding is gilded, but sometimes one does come across work that is primarily white with gold accents, or where the gold and white are more or less evenly divided. The clients for this job really like the gold and white look much more than all gold, which is more of a Venetian look than a French one; though that is somewhat of a generalisation. (a lot of German Rococo work was also done in gold and white) People's tastes have always varied, and the artists and craftsmen who catered to them have always adapted.

I had originally wanted to do all of the carved ornament in gold, and leave all of the linear borders white. The clients thought that that would still be too much gold, so they suggested doing the carvings in gold and white. Their idea was to leave all of the edges of the sculpted elements white, so that the line of white would flow, unbroken. In theory, it seemed like a viable option, and even the sample that I prepared for them looked good, however, by the time an entire section of wall was finished in that manner, it looked like something from a circus. I hated it.


I did not even take a picture of the entire wall like this; I did not want to
leave any evidence

After a thorough discussion with the clients, we agreed to increase the gold areas in order to minimise the busyness that the contrasting colours created. One thing that would have helped would have been if the gold were actually genuine leaf, but they do not like bright gold, and wanted a darker, "antique" gold colour. This darker gold also contributes a lot to the sharp contrast between gold and white, and made it more critical to not have so many areas of both colours together.

In the end, we all agreed that leaving a few areas of white, and all the linear elements remaining white did, in fact, give the look that they were after. (I am glad, because I never could have put these pictures on this blog if they had stuck with the first idea!)


This is the first view one gets of the project as they enter the house
and pass through the stair vestibule

More free-form sculpted decorations

My new favourite vantage point of this project

This wall is nearly complete, there is one more
frame to the right of the door which still
must be completed

Just to remind everyone of where we started, here is a picture of the early stages of this project. I "took pictures before I started", but later discovered that the card was not in the camera. At this stage, the lower mouldings had already been installed, and most of the walls were plastered. This picture was taken just before the onset of the upper moulding installation.


It looks so plain and empty by comparison


Sunday, May 1, 2016

Plaster Moulding Project Update

It has been a few weeks since I posted anything about my ongoing moulding project, but it is wrapping up nicely. This week I will be tackling a new aspect of the project which is to paint faux marble in the lower panels in all the rooms where I have been working. In the picture below you can see the sample I prepared for the clients. They were extremely pleased with the results. A future blog will feature this process.


Small vestibule off of the main passageway
In my last post on this project, most of the moulding was finished, except for the large archway. I had cast two sections of it on a table and then attached them to the wall, but then still had to make the tight radius ends, which I did on-site. I decided to do the entire other side this way instead of forming pieces on the table and transferring them. The results turned out well. Thomas took pictures with his phone, so sorry for the poor resolution. Looking at all the pictures, it is odd to see that there are none showing the actual process of shaping the moulding with the form. It looks like some sort of conspiracy to guard against the trade secrets, but was not intentional.


The process begins with a piece of rope used as a "backbone" to anchor
the moulding to the wall

It also serves as a base from which to begin building the plaster up


Layer by layer it gets built up
The template is passed over the plaster after each application


Still does not look like much

A little free-hand forming


To the right you can see the moulding begin to take shape

Hiding the secret to how it is done


Nearly finished


Because the template is made of aluminium it leaves black marks on the
dry plaster wall

Finished and ready for cleanup
What we did not manage to get any pictures of was my process of sculpting leaves and flowers from freshly applied plaster, but some of that was done as well. I began with the castings that were made for over the doors, but stretched it to more than double the length by breaking it in sections, adding wet plaster between, and then sculpting it to match up to the cast parts


Finished plaster arch moulding with sculpted leaves


Another thing that has been done is the changing
of the newel posts and balusters.
(they were just simple square pieces)