Sunday, June 7, 2015

A Splendid Early 20th Century Carved Walnut Chair

For Europeans, the standard age of an "antique" piece of furniture begins at 150 years; Americans begin calling a 100 year old piece an antique. (Some even call anything earlier than 1970 an "antique" actually). For me, I have a personal bias against most machine-made furniture, and therefore think an antique piece was made before most aspects of furniture making were done by machinery; which would be around the 1840's. I generally do not pay much attention to furniture made after that time period, as I usually consider it of inferior quality. This is a prejudiced view, however, and is also hypocritical, as it would, by definition of age, render worthless the things that I, and several other outstanding cabinetmakers that I know, create. I was recently confronted with a piece of furniture which made me reexamine my bias and realise it was just that; an arbitrary notion based on assumptions. 

The item which I am referring to is a chair which a client, who met me at my show in Waterford, Virginia, brought to my shop for restoration earlier this spring. Two things were immediately obvious, even before any thorough examination of the chair took place; the first was that it was early 20th century, the second was that it was produced by a craftsman with phenomenal skills!  


Broken corner of the chair leg


Even though the chair was thick with a terrible coat of varnish and had been badly treated by a previous "restorer", the chair was still  extremely beautiful both for its proportions, and for its meticulously wrought carving.

A healthy percentage of my income is generated from the restoration of antique, and some not so 'antique' furniture. This post will be dedicated to the subject of restoration; primarily to showcase this exceptional chair.

Antiques have been a part of my life, for as long as I had a life to be a part of. I grew up with pieces of furniture ranging from the 15th to the early 20th century. The notion that modern furniture was rubbish entered my head via my grandmother's, and through her, to some degree, my mother's opinions. I remember, as a young kid, going to antique sales a few times with my grandmother, who was quite avid in spotting all the fakes and forgeries; or at least she was in her own mind. I was too young to know if she knew what she was talking about or not, but a couple of my earliest lessons which I remember from before I was 10, were that boots do not wear out table stretchers in such a way as to leave a series of facets, (as would be produced by a drawknife) nor do chains and nails replicate the genuine wear of time.

Somehow, my grandmother's love of antiques must have rubbed off on me, and I have been interested in them my whole life. I also love restoring them for the educational value of the excercise. No better teacher can be found for learning how fine (and sometimes not so fine) furniture was made in previous centuries, than by being able to turn it upside down and inside out.

As usually happens when I do restoration work, I started working on this chair before thinking about getting the camera out to take pictures. I did manage to take a couple pictures of it to send to the client, and that gave me the idea to take enough pictures to feature this chair on the blog. It was not a hard decision, because, though the chair is from the Turn of the Century, the carving is as fine as one could ever hope to come across. Truly whomever produced this piece was a master at his craft.

The saddest part of the condition of this chair was the "repair" of the arm.
The screw was too long and broke out the carving. (Beside the fact that it
did not actually hold anything together.)


The work needed to repair the chair was not a lot, but the biggest problem was that the previous person who had worked on it, somehow managed to break the arm and then tried to fix it with Gorilla Glue and a drywall screw. The two halves were not properly aligned and the screw broke out a piece of the arm. Needless to say, the owner was sickened by the whole affair. Last year at my show, she happened upon my booth, and after talking with me, decided I might be able to rescue the chair. I will let you be the judge, based on the evidence I present.


The rags and string are to absorb the material used to strip the finish.
The arrows point out some of the "dots" broken off when the previous
person removed the upholstery.

Showing the finish ready to be removed


I have developed a process of getting the finish to shrivel and come loose from the wood without the need of lots of sloppy stripping materials or liquid scrubbing. The result is that the finish is removed, but the colour and grain sealers remain.


Gluing the arm back together


Once I had the finish stripped and the arm repaired, I invited the client back to discuss the finish. I had scrubbed a corner of one arm with a brush containing wax, and realised that that was the only finish the chair really needed, but decided to let her see it and determine if she concurred; she did.

Three of the 14 "dots" which were broken off.


Somehow, I forgot to take a picture of this once I
had chiseled out the area for the new wood but the
red lines indicate approximately the area removed.
This block was a guide to help achieve a square cut.

The replacement part; made from the same kind of wood as the original.
Look carefully to see the 'leg' which was carved out from a thicker
piece of wood.

Showing the bit of fielding which had to be cut into the side
of the replacement piece.

The offset 'leg' which was made by cutting away material; not gluing on
an additional block.

The finished replacement corner.

Another problem was that when the previous person removed the old upholstery, he broke off several of the little 'dots' on the border. My client was gracious enough to watch me do some of the repair work, and take pictures as I did so. It is my thanks to her for the following series of pictures of me working. (It is very hard to take pictures of ones self whilst they are cutting or carving something.)

Making new 'dots'; step 1 - a piece of walnut cut to the correct thickness

Step 2; rounding one side with a chisel.

Step 3; marking the pin with a marking gauge.

Step 4; splitting along the line made with the gauge.

Step 5; shaving the other side round with a chisel.

Step 6: 'doming' the end.

Step 7; checking the diameter.

Step 8: trimming the diameter slightly.

Step 9: cutting to length.

Step 10; Shaving a taper.so it will go more easily into the hole

Step 11; the finished pin, ready to install

Step 12; Installing the pins


Once all the parts were in place, I sealed the new bits with a couple coats of shellac, then gave the entire chair two good coats of wax.


Finished chair showing the same three pins

Three more of the replacement 'dots'

I chose to replace the 'dots' with end grain pins because glued on little tiny pieces would have been prone to breaking back off easily.


Finished Chair; ready for upholstery
(apologies for the poor picture; I should have 
taken it outdoors.)
I have an upholsterer who I have been using 
for more than 15 years. He did an excellent job
of building a new seat and covering the entire
chair in calico (muslin, for American readers).  

The most interesting part of this chair story, however, is that the client loves to do embroidery and will be making the coverings for this chair. She plans to use the floral sprays from the Lady and the Unicorn tapestry series in the Cluny as her inspiration for the fabric. I cannot wait to see that finished. I will put an update to this post once it is complete.


Floral sprays from the Lady and the Unicorn tapestries.
She will probably not include the rabbit, but I think he is cute

Sunday, May 31, 2015

Table Progress - Part VI


In the last episode of this table project, I was holding out for some more cool weather so I could finish my steam bending. I got what I was waiting for on 21 May, when the temperature only got up to 13 C! At the time, I had been working on cutting out the shaped ends of the table feet, as you shall see in a moment, but with a day like that, I dropped everything and got my bending forms, steam box, firewood, insulation, and everything else that might be required ready. That was a Wednesday, the prediction for Thursday's weather came true and I got to work early in the morning. 

At 5 in the morning I got the fire going and had water boiling in the tank by 8. At 11, a good friend of mine came over to help and we had the last three sections in the forms by 1,30. 

That is the short, abbreviated version, the actual version has been deleted do to language censorship. A couple pieces did not want to cooperate as well as I would have liked them to, so they required a bit of verbal encouragement; no cracking allowed in this shop! In the end, all worked out well, and the bending operation is over and was successful. 


An ancient wagon tyre made a good bending form
The outside frame for the top


Earlier, in the same week, I also planed flat the entire table top which had just been glued up in the last post; it turned out well, but required a lot of planing to get an even surface. (The pile of shavings in the picture is only a small fraction of what was actually produced.)


Flatting the table top


And now on to the main topic of this post; the feet...


It all begins with a big chunk of timber 220mm wide and 100mm thick.


This table is made of elm, but because these feet will be subject to bumps and bruises from chairs, mops, brooms, and everything else, I wanted to use a harder wood for them. I found this nice piece of American hickory; noted for its toughness, this should make very durable feet...even if it is not so easy to carve.


Two pieces cut to length

The profile is marked out and saw-kerfs are made to remove the waste


When I left home as a teenager, I landed a job working on a building site; we learned how to cut tenons by making multiple kerfs in the timber, breaking out the segments with a hammer, then cleaning up the faces with a chisel. When I started making furniture 20 odd years ago, this seamed to me the most logical way to do profiled shapes as well. If the timber is wider than it is thick, or thicker than 50mm this is the way I always do it; the 'right' method is often the one that works for you. (50mm or less in thickness can be cut quicker with a saw) I have no idea of what method one might have used "in period".

Faces cleaned and top edge moulding carved

Ready to begin carving the volutes


Though Vitruvius goes into great lengths to describe the proper method of designing a volute; as an artist, I just use my eye and sketch out what looks right. This method is sure to make any mathematician, architect or engineer groan, but it gets the job done. Once the design is to my satisfaction, I use an awl and make a series of points along the line, transferring the design onto the timber. Using the series of holes also helps because the form is still visible from the back side when I turn the pattern over to do the opposite end.


The spiral, pricked in with the awl, is clearly visible here

Roughing out the design


To carve these spirals, I choose chisels which have the same sweep (curve) as the section of the spiral that they span. I do a "stab" cut straight down, and then a couple gouge cuts to remove the chips. in this way, I work right 'round the entire design. Sometimes one does not have the perfect curve for a particular section; in these cases, a slightly less curved tool will do. Care must be taken not to go too deep into the intended exposed face when making the downward cuts.


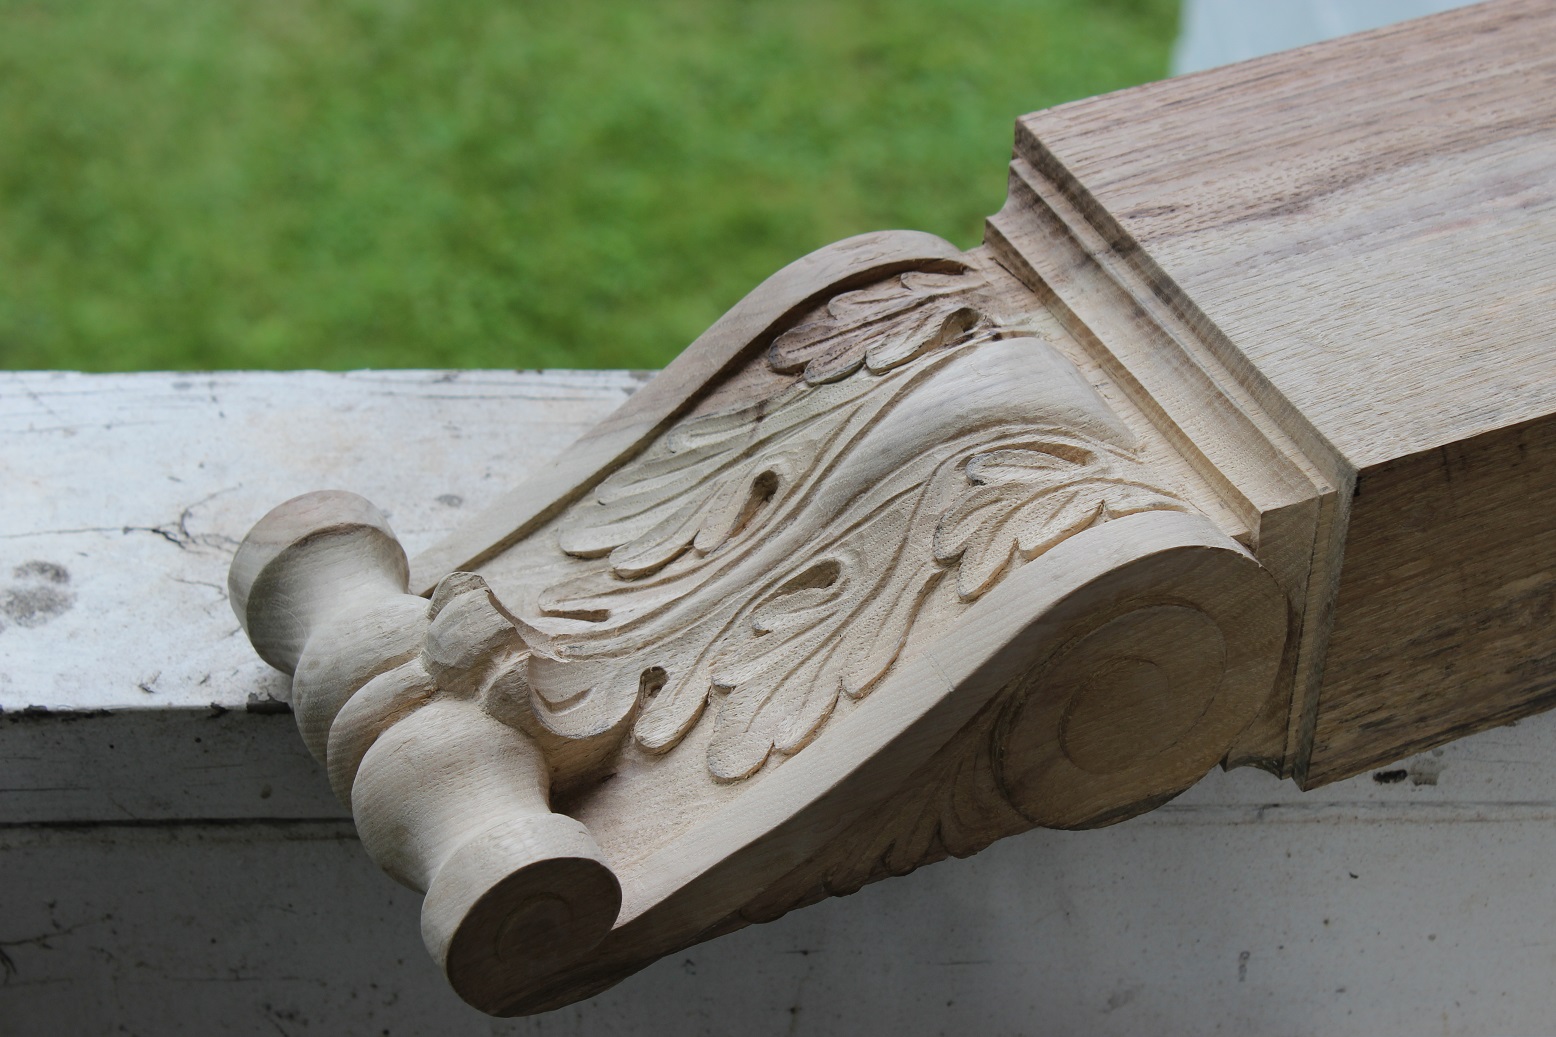
A finished spiral; this form is known in Classical architecture as a
modillion and served as an eave (overhang of a roof) bracket. In
the application as a foot, it is actually upside down.

Different day - different foot, but the same idea; this one showing the leaves
carved in between the scrolls. (I had both ends done before breakfast)

11 AM, breakfast break is over (two days after the previous photograph)
and it is time to begin carving the acanthus leaves on the second end.


Sometimes I feel more like a woodpecker than a wood carver, and the day I worked out this design was certainly one of those days. One cannot over-emphasise the utility of having a sample of what one wishes to carve. I had no such sample, so had to work like a woodpecker hacking, poking, and chopping until I found what was hidden in the blank of timber. It took me the entire day and several hours of the next morning to carve the end which is away from the camera in this picture. 

Once I had worked out the design, however, I made a paper template by rubbing over the carving with my finger. I then cut out the template, using the gouges which would be used to cut the wood, and then labeled each cut with the appropriate gouge number. In this way, I was able to make repeated and uniform shapes on all four feet.


The central 'vein' is drawn out free-hand...

then cut with a 'V' gouge.
After that, the remaining face is leveled and sunk below the surface
of the sides. This task of removing excess material is known as "wasting away".


I have a table with all my gouges laid out from smallest to largest in a shallow profile and a deep profile. I initiated this method to make it easier to pick up the tool I need without hunting for it in a pile of chisels as is visible in some of my photos from other projects. It is a good plan.


Keeping the tools (more or less) organised helps the work go more efficiently

Here you can see my paper template with the notations for the various
tools used for carving. I only needed to make half of the leaf, because the other
is a mirror image. I simply flip the paper over and draw the other side.


When I carved the leaf design on the side, it was simple enough not to need a drawing or a template, I knew which gouges to use, and approximately where to make the cuts. Carving a design as complex as these acanthus leaves was another matter entirely. Even if I remembered exactly which tool to use for every lobe, I would still mess it up, due to a mild case of dyslexia which gets me very confused when it comes to mirror images. I have made two rights or two lefts enough times to know that I need a pattern to guide me on things like this.


The sun is high overhead, and the first 'layer' of the leaves is set out

Now the sun is coming from the left, the day is wearing on; the carving
continues.
To the left you can see a piece of leather; this is charged with bee's wax
and rotten stone. I use it to keep my gouges very sharp; as a barber does
with a razor. With this method I only need to use a sharpening stone
on the rare occasion when I get a nick in the blade.


Chop down, cut under, chop down, cut under... and so the day goes. One tricky part of this is that the grain is running parallel the length of the timber; when one chops down at right angles to the face of the foot, it is actually at an angle running with the grain. Therefore, when it comes to the under-cut, it often happens that the chips do not actually get cut loose, as the two cuts have not intersected completely. This can lead to some aggravation, and increases the length of time it takes, compared to carving on a flat surface.

6 PM; the form is all there, now for the details and cleaning up work.


I have carved a couple other versions of acanthus leaf brackets before, but this was the first time I tried the upward curving 'tongue' at the end of the leaf. It has always looked a bit challenging, and it turned out to be so, as well; not so much in complexity, but in the time it takes to remove all the waste material around it. By comparing this picture with the last one, based on the angle of the sun, it took me a couple hours to finish this part up.


The memory of this foot was my model, but this
one has no upward curving end. (I did this one
in 2006)


7,30 PM and it is finished

A different angle for better lighting. I still need to do the underside of
the end reels.


When it takes 8 1/2 hours to carve the face of one foot, you realise you are not in this work to get rich. The work represented in these pictures took two full weeks of work (13 days) from dawn till dusk. I do it because I love it. Most people who get a job to make something, try to figure out the fastest way possible to get the job done and get paid. I do my work because I love it; the time it takes me to get it done is beside the point. Of course I try to improve my efficiency as I go along, and try not to waste time, but if my primary goal was money, I would find another profession. So long as I am able to pay the bills, and encounter customers who appreciate what I do, I will keep doing what I love; the way I love to do it - which is making things by hand.

Lighting is an important part of carving


This was foot number three, which I began about 6 in the morning, In this picture, it is about 9 and the sun is at the right angle to really show up every mark of the blade in the wood. The funny thing about carving, is that one can carve the whole thing under one source of light, and have it look perfect; only to turn it around, and discover a thousand flaws. The best way to get it looking good is to expose it to multiple angles of light. This fact is why, when the temperature is neither too cold nor hot, I like carving outside. As the sun makes its course through the day, the light changes, and I can go back and work the blemishes which show up under different lighting.


8 PM Saturday evening; three ends complete and the fourth under way
(the lower foot is darker because it remained all day outside in the sun)


To finish up, I use fine rasps, files, and small scrapers to smooth out the reels and the scrolls on the sides, the carving will remain as it is, save a bit of scraping with a small bit of a saw blade where there might be a bit too much tool markings. Overall, tool marks are what gives carving character and more appeal than machine "carved" ornament.

On Thursday night, after dinner, I finished carving the underside of the scrolls of the first foot, and did a bit of filing and scraping to give the reels a more finished look. Once that was done, I stood looking at it, and thinking how much like my 'child' the thing was. I then got a bit philosophical as I realised how much that was true; but on a much deeper level than I had originally been thinking.

Given however (too many) billion people in the world we are up to these days, the possibilities of your child being seen by more than the tiniest fraction of the population is nil. Of those who do see him or her, for the majority, he will only be a nameless face in a crowd. Others may see a boy or a girl; man or woman but nothing more than that. An even smaller number of people might take the time to notice a girl on a swing, a man on the corner with a newspaper, or someone driving in a big hurry to an unknown destination.

It will be the tiniest of all fractions of people who actually get to know Hans, or Maria, Peter, or Ingrid, on a personal level of some degree or other. In the same way, most people will never know my table exists, for others, it will be nothing more than that; a table. A few might get to actually noticing a foot on the table, but no one will know that foot; that child, as well as the parent. Only the parent knows all about its history, it flaws, and the labour and energy spent in its creation.


Videre Scire