Sunday, January 24, 2016

Making Plaster Moulding

The project which I have been working on for the past 4 months has given me a chance to practice a lot of different skills that I have developed over the years, not all of which are actually related to furniture or woodworking. However, I am not just a furniture maker, I am an artist. One thing that I like about being an artist, is the chance to discover and try new techniques and methods of doing things.

Such has recently been the case, because I have been teaching myself how to make plaster moulding. I am sure that I read, many years ago, that this type of moulding is called "struck moulding", but I have been unable to verify that at present. Simply put, the process  consists of making a template out of a thin material (metal) and passing it over the wet plaster. There are a lot of subtleties to the process, however, and I am sure I have barely scratched the surface of discovering them. I have managed to figure out enough, though, in order to get the job done. Below are some photos of the process, and some of the resulting product.

To make a curved piece of moulding is much more challenging than making
a straight section; unfortunately, I needed arches, so I had to jump in at the
deep end. If  I were to start over with this, I would have made and arm which
pivoted from a centre point, but I did not think of it until after I was finished.


My regular readers will already be aware that another of the skills that I posses,
is that of metalworking. This skill comes in handy when one needs to make
templates. I first used a pair of snips to cut as much material away as possible.

I then used a file to finish up the shape according to the profile I desired.
There was no "right or wrong" for this profile because I invented it...

But this one had to follow an existing section of moulding; looks like it does.


Making the moulding cannot be done in one pass, it must be built up and allowed
to set before another layer can be laid down, otherwise there is too much material
squishing around. I put a section of rope into the wet plaster for strength.

After the second pass the moulding begins to take shape, but it is still not perfect.

The third coat is a thin layer spread out all over the moulding.

One final quick pass with the template makes a finished piece of moulding.
This is one half of the large flat arch going into the vestibule.
After three or four days it will be dry enough to crack free from the varnish which
I applied to the area of the table, covered by the plaster.


Sunday, January 10, 2016

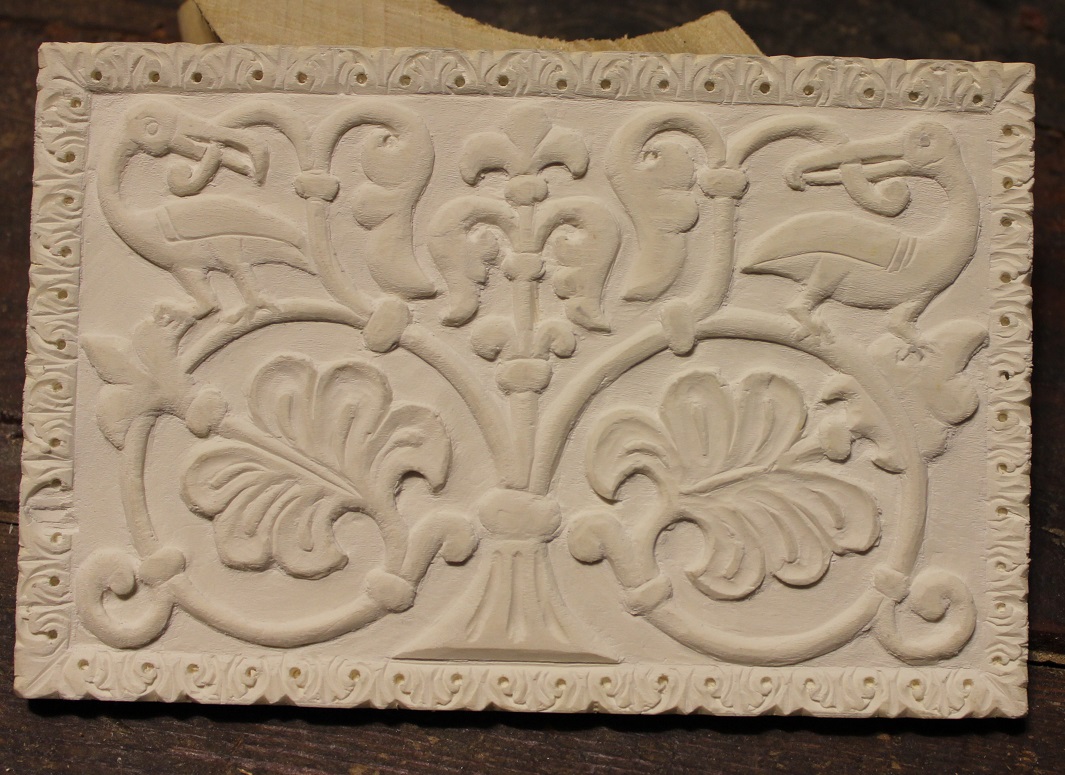
9th Century Ivory Box - Right End Panel

Happy New Year to everyone. I had intended to post last week, but my "real job" has been keeping me too busy. I also had to write an article for a tool collecting newspaper; thus, this is my first posting for 2016. How did we get here already. I remember as a kid in 1974 thinking 2000 was so far away I would never live to see it, yet here it is, 2016 already!


This 9th century box I have been working on is something very important to me, I see it as a mission to demonstrate that there can be more to re-creating medieval furniture than dug-out coffers and "six plank Viking chests" Even though I have been extremely busy with my paying project, ( I have been averaging 74 hours per week on it) I still want to keep the momentum going on this little chest. Taking a cue from the tortoise, even if the progress is slow, keeping at it will eventually result in the project getting finished.

Over the past few months however, the progress has, by comparison, made the humble turtle seem to be positively streaking along. In October, when I went to take the class with Peter Follansbee, I took this panel with me, thinking that I could work on it in the evenings, and early mornings, but only managed to get the head of one bird carved before the last day of the class began. I again took it with me to my show in York, but most of my time was spent carving pieces for my job, and only on the last day, did I have about 4 hours in which I managed to get the rest of said, left-hand bird finished.

For Christmas, I determined to give myself a gift; namely the time to work on the carving again. Over that weekend I was able to get the rest of the vines and flowers carved, along with the second bird, but I still had to finish the border. I was able to get that finished, bleached out, trimmed to size, and inset, this weekend.


The bright sun really enhances the whiteness of my faux ivory.


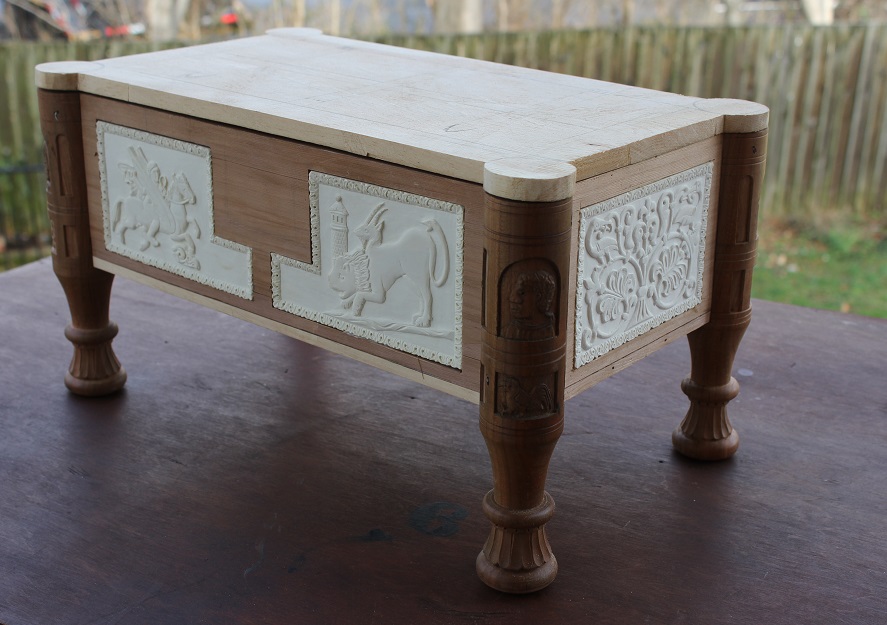
This project has gone through a lot of evolution from my initial concept. It was originally to have been a box made all from holly, and, had I done that, it would be more than half completed by now. The first shift came, however, from my studying of several boxes which were constructed of some sort of wood with ivory panels inset, so I began making this box after that manner of construction. (For anyone reading this for the first time, I will repeat that my goal is to re-create an ivory box, but since ivory is a banned material, I have landed upon the idea of using bleached holly, which makes a fairly convincing substitute.)

Another factor in changing the construction details of the box, was the fact that the sides are a bit wider than a piece of ivory could realistically give. I have since come across a 10th century box which is about the same size, and the problem was solved by simply joining narrow strips to the panels to make them wider. At the time I began this project, however, I did not know if such methods would have been used, so I did not try to do that. I am going for a very convincing, and authentically constructed box, so if I have nothing to back up my methods, I will not use them.

Overall view of the box, viewed from the right


For some reason, I hate pictures of boxes or chests viewed from the right end, so to set the world right in my mind, I will put another view of the other end, which is the way I like to view rectangular objects.


Today was bright and the weather pleasant, so I thought it would make a
nice picture, unfortunately, it was too bright for the camera, so the details
are largely washed out. I guess I am better as a carver, than a photographer.

Up next is the back panel for this box. I have no idea when I will get finished with it, but will try to get working on it soon. This, and the top panels will continue the narrative of the story of Bellerophon and Pegasus, the subject of the front panels.


The back panel smoothed and ready to have the design drawn in.
It will be made from the centre material left from the ends
and front panel pieces. Just as with Ivory, the material is expensive
and not readily available, so care must be used to avoid waste.
I am able to get three layers of panel out of a single 25mm plank.


Sunday, December 20, 2015

Carved Moulding - Part III

This posting will be mostly pictures. This job has been consuming all my time. I have a helper, who is working hard, and I have been working 12-16 hour days, yet we still have a lot of work left to do.

Here are some pictures to show the progress so far.


Most of the moulding in this room was purchased, but I did carve and cast
some of the pieces. I also carved the columns.

The plaster walls are done in a fresco technique, as in, the colour is added to the plaster. The paint on the mouldings and the columns is milk paint. I prefer to use it, because it has a much more "old" look to it than modern latex paints. The secret to beautiful paint is that it is not uniform and sprayed or rolled on, which gives it a much more natural and slightly varied look. Not everyone likes this sort of approach, but I am happy that these clients do.


The main act to this entire project was to re-do this hallway. I forgot to
insert the card into the camera again when I was taking the "before" pictures
so this is the earliest shots I have. I have already added panel frames below the
chair rail, added a new baseboard cap and plastered some of the walls


Although I have been doing a lot of carving for this job, plaster casting of the carvings are what are actually going onto the walls. Below is a group of sets of lower corners.


10 of the 11 sets of corners needed for this project;
carving this many copies would have gotten boring


As of Friday, nearly all of the castings have been applied to the walls, the main thing that remains is all the straight moulding to connect the decorative elements together.


View looking into the library. To the right, one sees
the beginnings of the columns, as well as the
moulding over the arch 

The arched moulding was made by an old technique of making a form and passing it over the wet plaster to create the shaped moulding. I will feature that work in another blog if I can get my helper to take the pictures as I do it. I still have several more to make.


A close up of a large crest. These extensions are the pieces I carved whilst
exhibiting at the York Art Festival. The central section is the same as for
the smaller panels, except the outermost leaves have been removed.
Final cleanup of the attaching plaster still needs to be done.


Another section of wall is shown below.


Wall section to the left of the dining room; this
section has the nicest configuration with two
small fields flanking one large one.


Carving is the main focus of this project, and this weekend I have been busy with some more. The good thing about doing so much carving is that I am getting a little faster at it. Below are the elements which will combine to create the lower centre section to the large fields. I carved them individually because it will be easier to cast them without breakage, which has been a problem on some of the thinner segments.


The left-hand leaf and three linking segments

The same pieces, three hours later

Centre section and the right-hand leaf; ready for carving

All done and ready to make the moulds now

I did not show the two extension for the centre crest before, so here they
are, along with the pieces I carved this weekend


Stay tuned to see how these all fit together in the project...


Sunday, December 6, 2015

Reflections and Thoughts

This post was to have been done last week, but since I had been away at the show a week before, I was behind on my job, and had to work last Sunday in order to try to catch up a bit, and keep the client happy.

The show I was at was called the York Folk and Fine Art Show, in York Pennsylvania. If I went there to make any money, it was pretty much a waste of time. However, since I went there mostly in hopes of "getting my name 'out there'", more, perhaps I had some impact. Mostly, though, it is my intention in this post, to pass on some observations that I made regarding crafts and the people who do them, whilst attending the show.


Let the show begin...


The first thing, which I have been noting more and more in the last four years that I have again tried to get into some sort of show circuit, is the average age of those involved. At 48 years of age, I was the 'kid on the block', as in, out of some 80+ exhibitors, there were only two, who were younger than myself. (both furniture makers also.) There was a wide range to the variety of arts and crafts at the show, but the common thread throughout, was that the artists were almost all in their mid 50's to 80's. (This fact helped me to realise I still have a lot of mileage left in me; since I began this career about 20 years ago, I guess I am just getting warmed up actually.)


Doing a little bit of demonstration to pass the time


I do not like to sit and do nothing at a show; I prefer to work at something, which demonstrates what it is that I do, for anyone interested in seeing the work in action. This also allows me to get some work done on whatever project I happen to be working on at the time. In this case, it was more of my moulding project; I finished two more sections whilst attending this show. I also got a bit more carved on my 9th century box.


I was able to finish a couple more sections of my
rococo moulding project

Back to the topic of my musings, the second thing that I noticed, was how few young people were in the crowd who attended. At the Waterford Show that I do, there were more kids, but even there, the vast majority of the visitors to the show were over 45. This makes me wonder who is going to pick up the mantle when those of my generation are no longer able to continue. Perhaps by then, there will not be anyone left alive who even cares?

This past week, a client sent me a picture of a console table with the subject line of "what do you think?"

http://www.wayfair.com/International-Caravan-Windsor-Wood-Console-Table-3808-INC1447.html

What am I supposed to think. What I think is that it is no wonder the craft shows keep getting smaller and less people attend them, either as exhibitors or customers. Think about the implications of this table. If an artist were really on top of his game, working quickly and efficiently, it would still take most of a week to produce this table (based on an 8 hour work day) That would come out to 48.60$ per day, or 7.32$ per hour, but that is not even the amount one would get, because he would still have to buy the wood. Assuming one made it out of the cheapest wood available, here in America, (poplar) which sells for about 2.50$ per 'board foot' (the way timber is sold in the country) it would cost a bit north of 50$ for the timber, then there would be hardware, stain, and varnish on top of that, the final material cost for this table would be close to 100$. When one considers this, the real question should be, why would anyone deliberately sell something so cheaply? I understand that it is produced in China, and labour costs are much cheaper there, but a lot of the timber for pieces like this is actually sent from here to there to be worked and then returned. Even if it does cost little to produce, what does one gain from selling it so cheaply?

This table is for sale on Wayfair for 293$ I hope readers can recognise the
difference between it and my work


In order to make money selling a product this low, a company would have to sell thousands, if not millions of them, to make any money. To make it worse, the company which is selling this table, is a publicly traded company, whose stock is currently worth more than 45$ per share. I am sure the President and CEO are making a bit more than 7.32$ per hour.

Don't get me wrong, I have nothing particular against capitalism and people finding a need and filling it, or even getting rich in the process, but by selling cheaply made products at such ridiculous prices, it ruins the game for most everyone else. It is a race to the bottom, and the consumer, not knowing any better, wonders why he should buy a table for 5 or 6 thousand dollars when he can get one for less than 300$. In the end, however, all the companies competing with each other for business keep slashing the prices further, trying to "capture market share" and wind up not making any profit and going bust.

I know of at least 4 large retail stores which sold this type of furniture in the area where I live, which have gone out of business in the past two years. It seems that even at 293$ not enough people are interested in a table to keep the business going. What happened to the notion of communities supplying the majority of the labour needed to support their own economies? In those days, there were lots of young people who were eager to learn trades, crafts and skills, because they could provide for their families by doing so. Now it seems that nearly everyone still doing this type of work is retired and doing it "for fun".

I attended a class with Peter Follansbee about a month ago at the Marc Adams School of Woodworking; there were three other classes going on at the school at the same time, and nearly everyone in attendance was either retired or past retirement age. Back in January, I attended a workshop at Colonial Williamsburg, same thing there as well, I was again the lone "kid" in the crowd.

I hope it is not all doom and gloom for artists like myself who have a passion for creating things by hand, but somehow, we have to get more people interested in understanding what we do, and why it is valuable, or we will all be gone the way of the Dodo Bird; and the kids will not even know that it happened, because they are all bent over some electronic gizmo doing who-knows-what, (certainly not creating anything).


A collection of my work, representing thousands of hours, as well as a
big part of my heart and soul; from a Chinese import store the lot would
probably sell for a couple grand.

Sunday, November 22, 2015

Table, Part X; Finished (Mostly)

It has quite some time since I posted anything about this table, and people have been asking me when it would be finished. It was actually done in August, but the clients were out of the country at the time. Basically, their schedule and mine did not agree for an earlier delivery time. I did deliver it a few weeks ago, but forgot to take my camera with me. These pictures were kindly taken and sent to me by the client. I just wanted to share them for anyone hoping to see the end of this project.


In this picture it is plain to see the reason for the table's unusual shape


A view of one of the feet


Another view


In the title of this blog I said that the table was "mostly" finished;
That is because the chairs for this table are not of a conventional
height and the table must be raised 50mm. I will make some additional
feet to attach to the underside of these bases. 


This weekend I am exhibiting at a trade show in York Pennsylvania, and will be posting about that next week.

Sunday, November 8, 2015

Furniture in the Salerno Ivories

Whenever I have free time, I usually spend it doing research on some aspect of the Middle Ages; this mostly falls into the more specific topic of furniture and furnishings of that time period. I study by examining pictures, reading books, and occasionally going to museums. (I would love to go more often, but time and budget affect that possibility considerably.

In preparing my recent post on the topic of stools in the Middle Ages, I came across a picture of a stool depicted in an 11th century ivory plaque from Salerno. I was intrigued by this picture, so I did a bit of investigation and found a book written on these ivories, and their history and cultural context, as understood by Robert Bergman, after he had conducted several years of research and study on them. In fact, the book I bought, The Salerno Ivories, was an outgrowth of his thesis on the topic.

In this posting, I want to examine the furniture depicted in these fascinating little ivory panels; in a future post I will compare these depictions with other artwork and actual objects which I believe are of the type depicted herein. I took all the pictures from my book, and have mostly only shown the furniture; should you want to see the rest of the ivories, I suggest you buy the book, as I did.


A throne chair and a foot stool


The furniture type which is most frequently depicted is the throne chair, for more of which, see this article. There are no two chairs depicted alike, even if the same person is portrayed sitting on them (which is only the case with King Herod).

Adoration of the Magi; another throne chair
and its surrounding baldachin 

King Herod, from the Massacre of the Innocents

King Herod again, this time visited by the
Magi. Notice the differences in this throne.


There are also, featured in one of the panels, a stool, a bed and a small table. In a previous post I pointed out, and will do so again here, that the bed is not a large platform supported by four spindly legs in its centre, as a literal interpretation of this picture might suggest. The artist was not concerned with depicting things as we see them, but was only interested in compositional harmony and rhythm. He had an interest in showing the turned legs for the bed, but had he carved the scene in a more realistic manner, the legs would be almost completely concealed by the seated figures, besides the fact that he seems to have wished to use the four upright legs as part of the vertical elements of his layout. 

Here is the original picture that sparked my interest in this topic


Another type of seating which has several representations is the plinth chair, which you can read more about here.


In the scene of Pentecost, the disciples are depicted either sitting on plinth
chairs or one long 'plinth bench', the end of which is portrayed on the
right of the plaque. Each figure has his own foot rest.

Three more plinth chairs and a round table
(my apologies for the sideways picture, sometimes
Google does this and I cannot figure out how to
correct it.)


Several other pieces of furniture depicted in the ivories are beds. I have shown four here, and there are actually a couple more in the series, but the details are not clear enough to be worth including them here.

The healed paralytic carrying away his bed

Noah asleep in his bed, after having gotten drunk.

Here is an example of medieval artists not being overly concerned with the details of the story whilst carrying out their creations. In the story of Noah, he was found naked and drunk, but here he is clearly already clothed before his son drapes the cloak over him. Medieval artwork is almost never to be interpreted as accurate depictions of anything, even if it may offer some visual clues.

Another(again, sideways pictured) bed, This one with decorative
turned legs and flared feet
Compare the detail of the doors in this picture with those in the above
picture of King Herod Visited by the Magi

St Joseph dreaming in a bed with bobbin and reel turned sides


And so that is nearly all the panels which have any meaningful depictions of furniture in them, but I want to put one of these pictures here a second time, in case you did not catch the other piece of furniture in it the first time.


A bottle of wine in a cabinet

Here is depicted a small bedside cabinet, with Noah's wine flagon inside. I believe it is intended as a cabinet because of how it is depicted, but I am also aware of a series of Old Testament fresco illustrations in a church in Italy which have similar cabinets beside Abraham's bed; thus giving me additional reason to believe what is pictured here is a cabinet. In one of those paintings, the doors of the cabinet are shown ajar. When I do the second half of this blog topic, I will share that picture for your own comparison.


I have often spoken about the level of detail depicted in the objects portrayed in artwork, as compared to actual decorations of objects, and the fact that artwork almost never shows the true extent of actual ornamentation. No better example of my point can be found than in the following set of pictures of ornamental fragments which originally framed these ivory plaques that we have just examined.

It is the theory of Robert Bergman, who spent several years studying these ivories, that these panels were originally part of a set of doors. As such, these ornamental bands would have formed the framework to the door panels. By looking at these decorative strips, we can get a better idea of the ornament which could have been used to decorate the sides of beds and chairs, or the legs of tables and cabinets. The remains of at least three medieval chairs, all older than these 11th century ivories, still exist, and all of them have the same degree of carved ornamentation to their structural elements. All of the decorations in the portrayed furniture are merely 'X's', zick-zacks, hatching, and dots, but this is due to the small scale of the carving. All of these ivory panels are only 90-120mm wide and to depict any accurate detail of a piece of furniture which is in an area of only 10 or 15mm would be nearly impossible, as well as being pointless. The people for whom these panels were made, already knew what beds, stools, chairs, cabinets, and tables looked like; it is only us, some 1000 years later who clamour for more information.


Several sections of ornamental carving which belong to this set of ivories


Videre Scire